
⚡ Add this skill
One command
Add the Autoplay PostHog session replay provider skill for an existing PostHog setup.View the docs →
Agent onboarding
Fetch this skill when a customer already uses PostHog as a session replay provider and wants Autoplay live user activity.View the skill →
- Project ID — links your PostHog project to the Autoplay product Autoplay will issue. Find it in the URL while logged into your project (the numeric value following
/project/), or under Project Settings in the sidebar. - Project API Key (
phc_...) — the public key yourposthog.init()call already uses. - Personal API Key (
phx_...) — only needed if you want the SDK to create the webhook destination for you (Step 3, Option A).
🎯 Step 1 — Get credentials from your existing PostHog setup
Find your Project ID and Project API Key (Settings → Projects → [Your Project] → General; the key starts withphc_ — not the phx_ Personal API Key, which posthog.init() rejects).
📺 How to find your PostHog Project ID and Project API Key
Save your Project ID — you will use it to register in Step 2 and configure the destination in Step 3.
Your app should already have
posthog-js installed and initialized — see PostHog’s library docs if you need to check the install/init() pattern for your framework (that page already shows the full posthog.init(...) call — no need to repeat it here). The one Autoplay-specific addition, inside your init’s loaded callback:
posthog.identify() with your own user id somewhere in the login flow (never the anonymous posthog.get_distinct_id()) — see PostHog’s identify docs if you need to check the general identify() / reset() pattern (that page already covers login/logout and why to avoid the anonymous id). The Autoplay-specific addition: include product_id in the identify traits (email is optional but recommended — it enables email-based scoping). This makes PostHog’s distinct_id equal your app’s user id — so the same id reaches Autoplay as user_id — and links earlier anonymous activity to the identified person. Merge these fields into your existing call (or use this as the full call if you don’t have one yet):
👋 Quick Tip: Once you add this code to your site, jump into our Discord and say hi — we will check your data is flowing and help you get fully set up!
Identity plumbing for widget-based support AI agents: make sure the same user identity flows across all three layers: PostHog
distinct_id / user_id, your chat widget session metadata, and the support AI agent backend sender identifier. If those do not match, chat replies will look like “no recent activity” because events are stored under one key and fetched with another.📝 Step 2 — Register your product with Autoplay
Now that your website is tracking clicks, we need to create a secure “ingest_url” (Webhook URL) and a shared secret (X-PostHog-Secret) so that data can be safely sent to Autoplay.
The autoplay-sdk was installed on the Quickstart page. Create a Python file with the script below, replace the placeholders with your values from Step 1, and run it once:
- product_id:
prod_wQ7r8kF9...— the issued Autoplay id - provider:
posthog - provider_project_id:
YOUR_POSTHOG_PROJECT_ID - ingest_url:
https://connector.autoplay.ai/ingest/prod_wQ7r8kF9... - ingest_secret:
{secret}— PostHog sends this as theX-PostHog-Secretheader - mcp_url:
https://mcp.autoplay.ai/mcp - mcp_key:
{secret}— your agent’s Bearer token - owner_token:
{secret}— shown only on first registration; save it securely
- Step 3 (PostHog webhook): use the
ingest_urlandingest_secretprinted above - Step 4 (read live activity): use the
mcp_urlandmcp_keyprinted above (mcp_keyis your Bearer token) - Future re-registration/rotation: save
owner_token; it is required and is not shown again
Re-registering your product
- A second
onboard_productwith the same provider/project pair returns 409 unless you pass the savedowner_token. - Re-run with
owner_token="<saved token>". You must still passcontact_emailon every registration. - After a successful re-registration, the
ingest_secretrotates. Update PostHog (Step 3) soX-PostHog-Secretmatches the new secret.
🔗 Step 3 — Set up your PostHog webhook
Now we must tell the website tracker (Step 1) to send its data to the secure address (webhook) you just generated (Step 2). You have three choices: Option A — Automated with the SDK (recommended) Let the SDK create and verify the destination for you — no clicking around in PostHog, no pasting Hog code. Run this once with the values from Step 2: 📺 Generate your PostHog Personal API Key- Join our Discord and say hi.
- We configure the PostHog webhook for you.
- You receive a 1Password link with your
ingest_url,ingest_secret, andmcp_key.
- In PostHog, add a Webhook destination.
- Webhook URL: paste the
ingest_urlprinted by Step 2. X-PostHog-Secretheader: paste theingest_secretprinted by Step 2. Do not create a new secret.
let url := .... For the general mechanics of adding a webhook destination in PostHog’s UI, see PostHog’s destinations docs — the Autoplay-specific part is the Hog source below, which shapes PostHog’s event data into the payload Autoplay expects.
PostHog webhook setup walkthrough
PostHog webhook — Hog source script (expand to copy)
PostHog webhook — Hog source script (expand to copy)
- In PostHog, go to Data pipeline → Destinations and open Autoplay Event Stream.
- Add a filter condition on the property you set in Step 1 — Person properties →
autoplay_experiment_group→ equals →autoplay, optionally combined with any other eligibility property (e.g.plan → equals → trial). - Use the destination’s built-in Testing tab to send a real event and confirm it only fires for a person carrying that property.
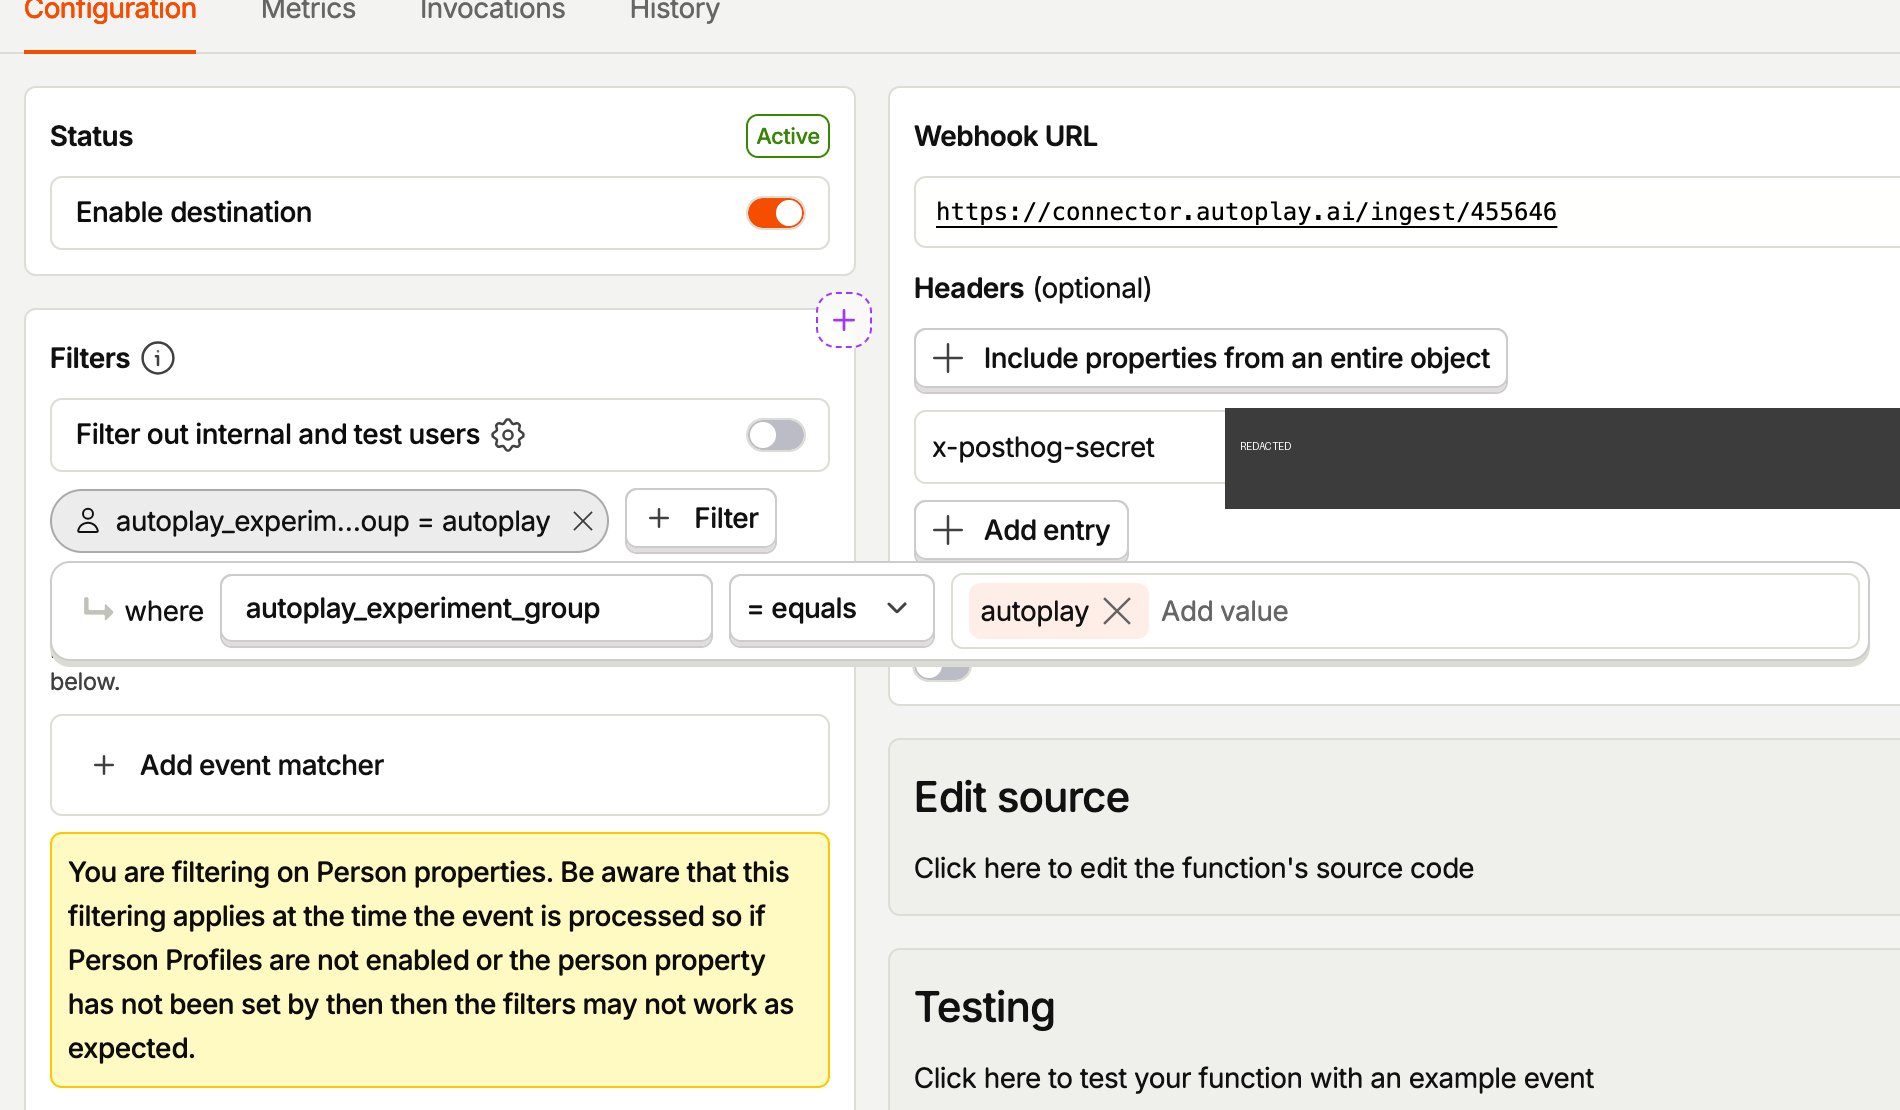
Validated against a live PostHog project. A destination filtered to
autoplay_experiment_group (person property) exact-matching autoplay only invoked for events from a person carrying that value — a comparison-group person’s $identify and $pageview events never triggered it, while the same events reached an unfiltered destination normally. PostHog compiles a properties condition like this into the same filters field the dashboard and API both read, so it behaves identically regardless of whether the destination was created via Option A, B, or C above.Unlike Amplitude’s template, the Hog script above only forwards a fixed set of fields to Autoplay (event, email, timestamp, session_id, current_url, etc.) — it does not include autoplay_experiment_group/autoplay_experiment_id in the payload itself. These properties only gate whether the destination fires; they won’t appear in the activity Autoplay stores.PostHog’s own filter UI warns: “You are filtering on Person properties. Be aware that this filtering applies at the time the event is processed so if Person Profiles are not enabled or the person property has not been set by then then the filters may not work as expected.” In practice: make sure the identify() call from Step 1 fires before the events you want filtered, not after.📡 Step 4 — See your activity land
Everything is wired up! The connector is pull-based — instead of streaming, you (or your agent) ask for a user’s recent activity the moment you need it. Let’s confirm your events are landing. Click around your app while logged in as an identified user, then fetch that user’s activity with themcp_key you saved from Step 2:
YOUR_USER_ID— the stable id you pass toposthog.identify(...).YOUR_AUTOPLAY_PRODUCT_ID— the issuedproduct_idprinted by Step 2.YOUR_MCP_KEY— themcp_keyprinted by Step 2.
200 with a populated actions array means your events are flowing. An empty array means the user identified but hasn’t browsed yet (activity is built from $pageview / $autocapture), or the events haven’t landed yet — click around and give it a few seconds.
This REST call returns the exact same data your agent reads — the agent just pulls it over MCP (the
get_live_user_activity tool) instead of curl. That’s the next step.🔌 Next: connect your AI support agent
Your activity is now flowing into the connector. Head back to Quickstart to choose your existing AI support agent and connect it via MCP — it then pulls a user’s live activity on demand, the moment it needs context to answer.Choose your AI support agent
Fin (Intercom), Maven, Ada, Botpress, and more — pick yours and connect via MCP.
extra field conventions used across the SDK, see Logging. Release history is on the Changelog.