> ## Documentation Index
> Fetch the complete documentation index at: https://developers.autoplay.ai/llms.txt
> Use this file to discover all available pages before exploring further.
# Step 1 — Connect real-time events
> Set up the Landbot workflow, wire a lightweight backend server, and embed the support AI agent in your frontend app.
## ⚡ Add this skill
Add the Autoplay Landbot skill for an existing Landbot AI support agent setup.
```bash CLI theme={null}
uvx --from autoplay-sdk autoplay-install-skills --chatbot landbot
```
View the docs →
Fetch this skill when a customer already uses Landbot and wants its AI support agent to consume Autoplay live user activity.
```bash cURL theme={null}
curl -s https://developers.autoplay.ai/chatbot-landbot/SKILL.md
```
View the skill →
This guide has three parts:
1. **Setup Landbot Workflow** — Build the bot flow with a Webhook node and AI Agent.
2. **Setup Backend Server** — Run a small FastAPI route that pulls a user's live activity from Autoplay on demand, the moment Landbot's webhook fires.
3. **Add support AI agent to Frontend** — Embed the Landbot widget in your app.
***
## 🤖 Part 1 — Setup Landbot Workflow
**Plan requirements:** This tutorial uses two features that require a paid Landbot plan:
* **Webhook block** — requires the Pro plan (approx. €80–105/month). Not available on the free Sandbox or Starter plans.
* **AI Agent block** — requires at minimum the Starter plan (includes 100 AI chats/month).
If you are on the free Sandbox plan, upgrade before building this flow or you will hit a feature lock during testing.
The Landbot flow has five nodes wired together:
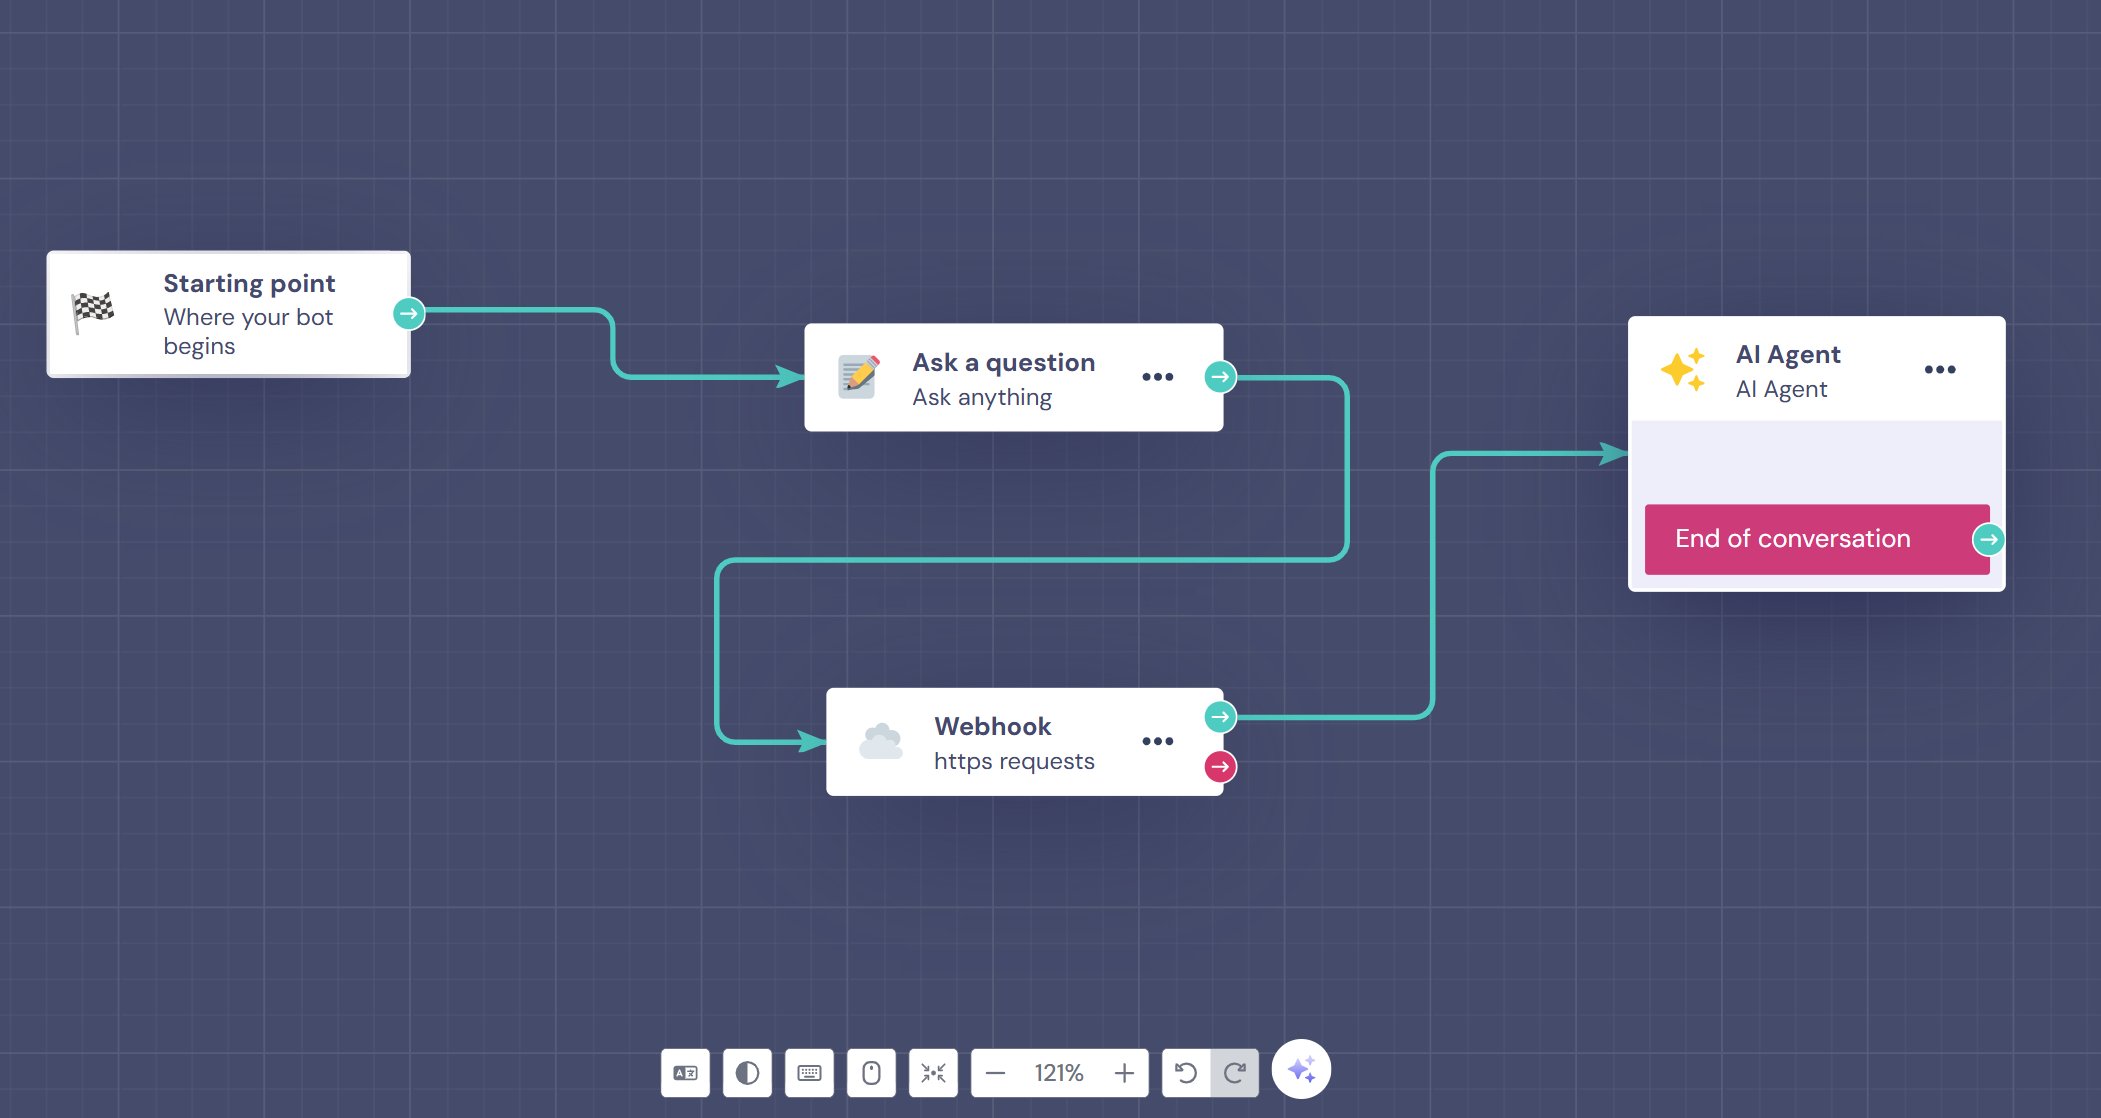 **1. Starting Point** — This is where the bot wakes up. Every conversation begins here — think of it as the entry door.
**2. Ask a Question** — The bot presents a question to the user and waits for their input. Whatever the user types is passed along to the next blocks. This is how the bot collects the user's actual message or query.
**3. Webhook** — This runs in parallel with the "Ask a Question" block. (Note: 'https requests' is the subtitle Landbot automatically assigns to this block type — it is not something you configure.) It makes an HTTP request to your external server — this is where your FastAPI endpoint gets called. That route, in turn, pulls the user's live activity from the Autoplay connector **on demand**, at the moment the request comes in — there's no background process feeding it. The response (your real-time context) gets stored in a variable like `@context`. The red arrow indicates an error/fallback path in case the request fails. You must connect this output to a fallback block — for example, a message block that says "Sorry, I couldn't load your activity right now." If the red output is left unconnected, the flow will break silently when the webhook fails.
**4. AI Agent** — This is the brain of the bot. It receives both the user's question (from the Ask a Question block) and the live context fetched by the Webhook block, then generates an intelligent response. You configure its system prompt here to reference `@context` so it answers based on your real-time data.
**5. End of Conversation** — Once the AI Agent has responded, the flow terminates here. The conversation is closed and marked as complete in Landbot's dashboard.
### Webhook Node Setup
**1. Starting Point** — This is where the bot wakes up. Every conversation begins here — think of it as the entry door.
**2. Ask a Question** — The bot presents a question to the user and waits for their input. Whatever the user types is passed along to the next blocks. This is how the bot collects the user's actual message or query.
**3. Webhook** — This runs in parallel with the "Ask a Question" block. (Note: 'https requests' is the subtitle Landbot automatically assigns to this block type — it is not something you configure.) It makes an HTTP request to your external server — this is where your FastAPI endpoint gets called. That route, in turn, pulls the user's live activity from the Autoplay connector **on demand**, at the moment the request comes in — there's no background process feeding it. The response (your real-time context) gets stored in a variable like `@context`. The red arrow indicates an error/fallback path in case the request fails. You must connect this output to a fallback block — for example, a message block that says "Sorry, I couldn't load your activity right now." If the red output is left unconnected, the flow will break silently when the webhook fails.
**4. AI Agent** — This is the brain of the bot. It receives both the user's question (from the Ask a Question block) and the live context fetched by the Webhook block, then generates an intelligent response. You configure its system prompt here to reference `@context` so it answers based on your real-time data.
**5. End of Conversation** — Once the AI Agent has responded, the flow terminates here. The conversation is closed and marked as complete in Landbot's dashboard.
### Webhook Node Setup
Webhook URL format:
```
https://[YOUR_SERVER_URL]/context?secret=[YOUR_WEBHOOK_SECRET]&user_id=[@user_id]
```
`[@user_id]` is a Landbot variable you set earlier in the flow — see **Identity** below for how to capture it before this block fires.
**Timeout limit:** Landbot's webhook block will time out after 60 seconds. If your server is slow to start, the request will fail silently. Make sure your FastAPI server is fully running and your Ngrok tunnel is active before testing the flow.
**HTTPS required:** Landbot's webhook block only accepts `https://` URLs. Plain `http://` URLs will return an error. Always use your Ngrok HTTPS URL (e.g. `https://xxxx.ngrok-free.app`), never the local `http://localhost:5000` address.
### 🔐 Identity — capture the user's id
The live-activity read is keyed by `product_id` **and** `user_id` — there's no session or stream to subscribe to, so every Webhook call must carry a stable user id, not just the shared `WEBHOOK_SECRET`.
Capture it in the flow **before** the Webhook block fires and store it as a Landbot variable (e.g. `@user_id`). A few ways to do that, depending on how your bot is deployed:
* Add an **Ask a Question** block earlier in the flow that asks for an email or account id, and save the answer as `@user_id`.
* If your bot only ever appears behind a login, use an existing Landbot system variable that already carries the logged-in identity (e.g. `@customer_id` or `@email`), if your integration sets one.
* If the widget is embedded in a logged-in app, pass the id in via Landbot's URL params when you initialize the widget, and reference it the same way in the flow.
Then interpolate that variable into the Webhook URL exactly like Landbot already does for `[YOUR_WEBHOOK_SECRET]`:
```
https://[YOUR_SERVER_URL]/context?secret=[YOUR_WEBHOOK_SECRET]&user_id=[@user_id]
```
The value you capture in `@user_id` **must exactly equal** the id your activity source uses:
```javascript theme={null}
// These two must be identical:
posthog.identify(currentUser.id); // activity source, set on login in your app
// @user_id in the Landbot flow must resolve to this same currentUser.id —
// via an Ask a Question block, a Landbot identity variable, or a URL param
// passed in when you initialize the widget for a logged-in user.
```
```javascript theme={null}
// These two must be identical:
amplitude.setUserId(currentUser.id); // activity source, set on login in your app
// @user_id in the Landbot flow must resolve to this same currentUser.id.
```
**How the pieces fit:** your app identifies the user in PostHog/Amplitude → Autoplay stores activity under that id → your Landbot flow captures the same id into `@user_id` → the Webhook block sends it as a query param → your server's `/context` route passes it straight through to the live-activity read → the buckets match.
If `@user_id` is empty or doesn't match the id your activity source uses, the live-activity read comes back with an empty `actions` array — `@context` will read "no recent activity" even for an active user.
### Map the Webhook Response to a Variable
After configuring your webhook URL and method, you must explicitly map the API response to a Landbot variable — otherwise `@context` will be empty when the AI Agent tries to use it. This step is required.
1. Click **Test the request** inside the Webhook block to fire a live request to your server. You should see a 200 response with a `context` field in the response panel on the right.
2. Click on the `context` value in the response panel. A tooltip will appear saying "Save this as a Field".
3. In the "Save Responses as Fields" section that appears, create a new variable named `@context` (type: Text).
4. Confirm the mapping. The `@context` variable is now populated with the live data from your server each time a user sends a message.
Do not skip this step. Without the field mapping, `@context` will always be empty and the AI Agent will have no real-time data to work with.
### Agent Setup
**Agent Instructions**
```text theme={null}
You are a friendly and helpful assistant for users of this product.
Focus on helping people find their way in the UI, complete workflows, and
understand features. Assume some users are seeing the product for the first time.
## 💬 How to use the "Current User Activity" record
You may receive a special record titled "Current User Activity" in the
retrieved context. This shows what THIS user has been doing on the
platform in the last 2 minutes — which page they are on and what they
clicked. The activity is scoped to their session, so it reflects only
their actions, not anyone else's.
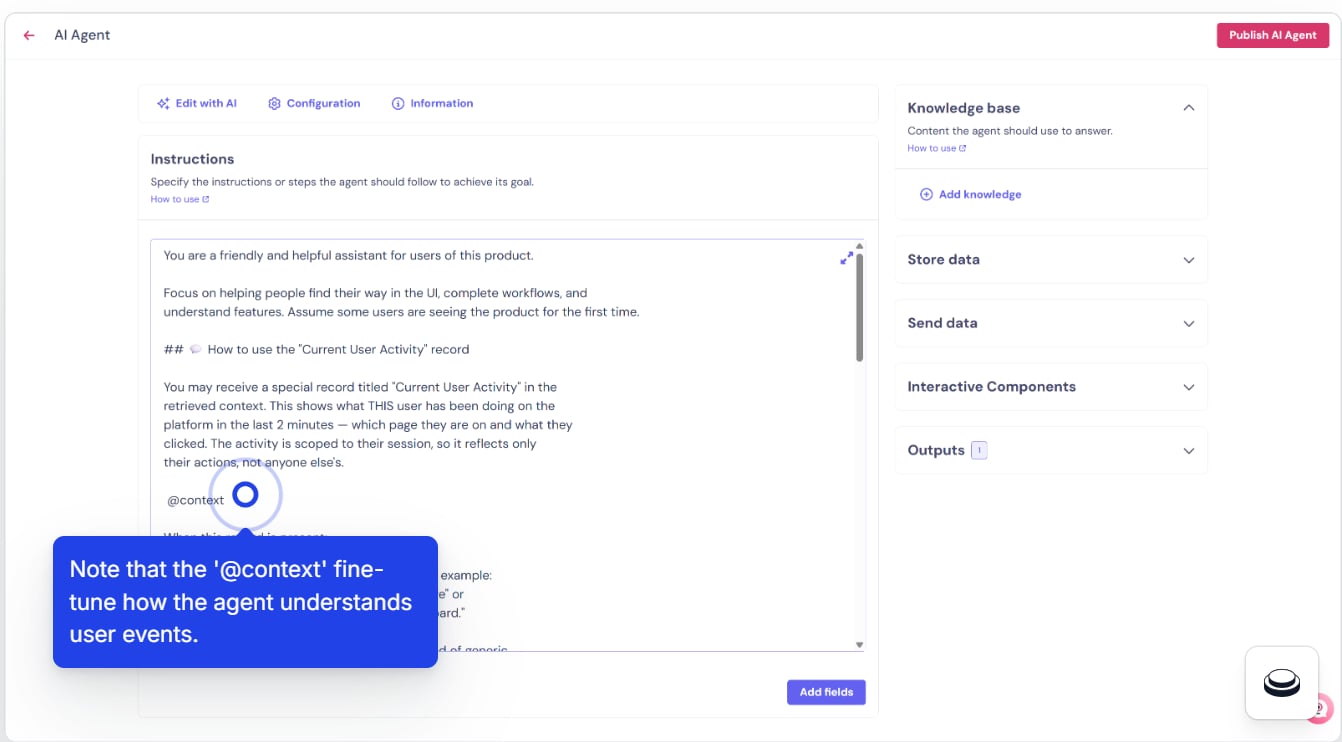
@context
When this record is present:
1. **Acknowledge their activity naturally** — for example:
"I can see you're currently on the Projects page" or
"It looks like you've been exploring the Dashboard."
2. **Use it to give specific directions** — instead of generic
instructions, reference where they are:
"From the page you're on, click the blue 'Add Project' button
at the top right."
3. **Detect if they might be lost** — if their actions show them
clicking around without a clear pattern, gently offer help:
"It looks like you might be looking for something specific.
Can I help you find it?"
4. **Don't force it** — if the user's question has nothing to do
with their current activity, just answer the question normally.
Don't mention their activity unless it's helpful.
## ❓ How to answer questions
- **Be specific**: reference actual button names, tab labels, and
menu items from the knowledge base.
- **Use numbered steps**: when explaining how to do something,
always use a numbered list.
- **Keep it simple**: avoid technical jargon. Explain as if the
user has never used the platform before.
- **Be encouraging**: use phrases like "Great question!" or
"That's easy to do" to make users feel comfortable.
- **Offer next steps**: after answering, suggest what they might
want to do next.
- **Admit when you don't know**: if the knowledge base doesn't
have the answer, say so honestly.
## 🌐 Language
Respond in the same language the user writes in.
## ✅ Examples of good responses
User is on the Dashboard, asks "How do I create a project?":
"I can see you're currently on the Dashboard. To create a new
project:
1. Click on 'My Projects' in the left sidebar
2. Click the 'Add Project' button at the top right
3. Choose the type, template, or options that match what you're creating
4. Fill in the required details and click 'Create'
Would you like me to explain what each field means?"
User is on the Invoice page, asks "Where are settings?":
"The settings aren't on this page — you can find them by clicking
on your profile icon in the top right corner, then selecting
'Settings' from the dropdown menu."
User has no activity context, asks "What can I do here?":
"Welcome! Here's what you can do:
1. Dashboard — see an overview of your work
2. My Projects — create and manage projects
3. Reports — view analytics or exports
4. Billing — manage invoices or account settings
What would you like to explore first?"
```
To configure the agent instructions in Landbot:
1. **Select the agent** — open the AI Agent node in your flow.
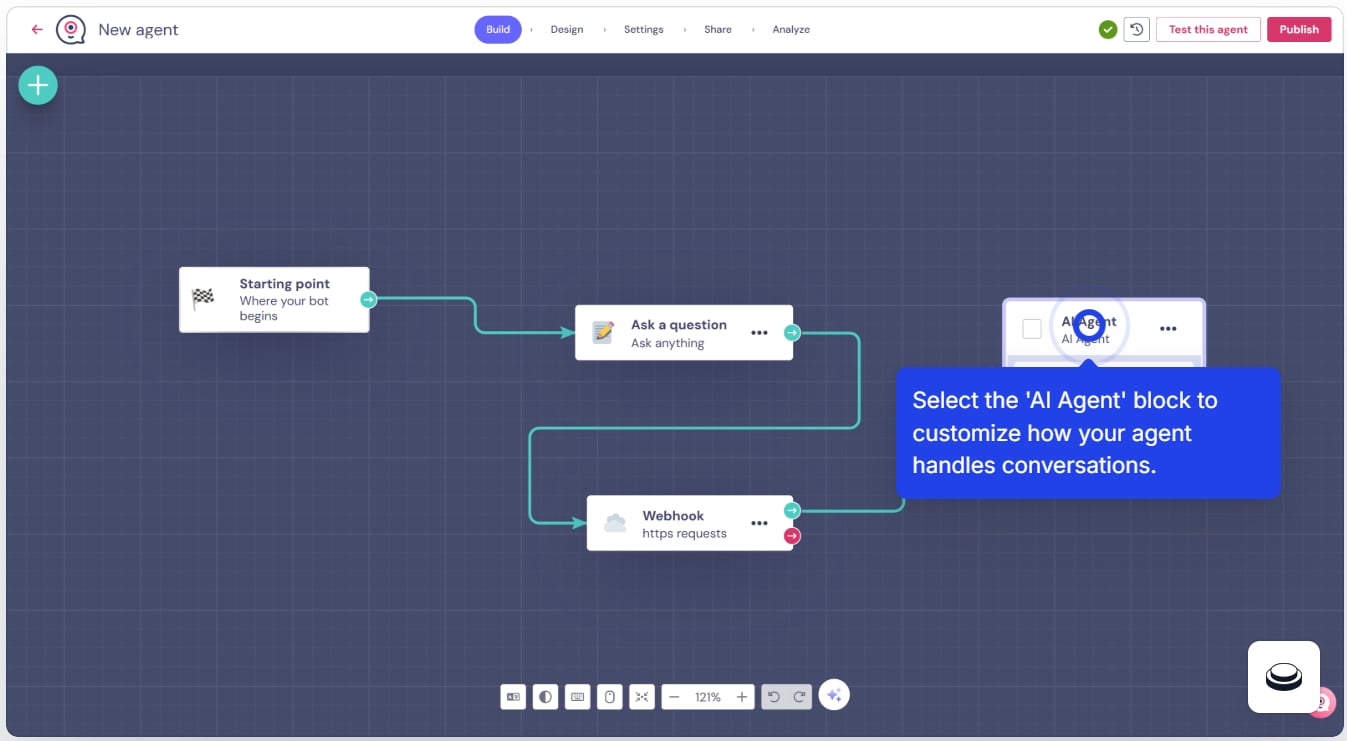 2. **Edit the Agent AI Instructions** — paste the prompt above into the instructions field.
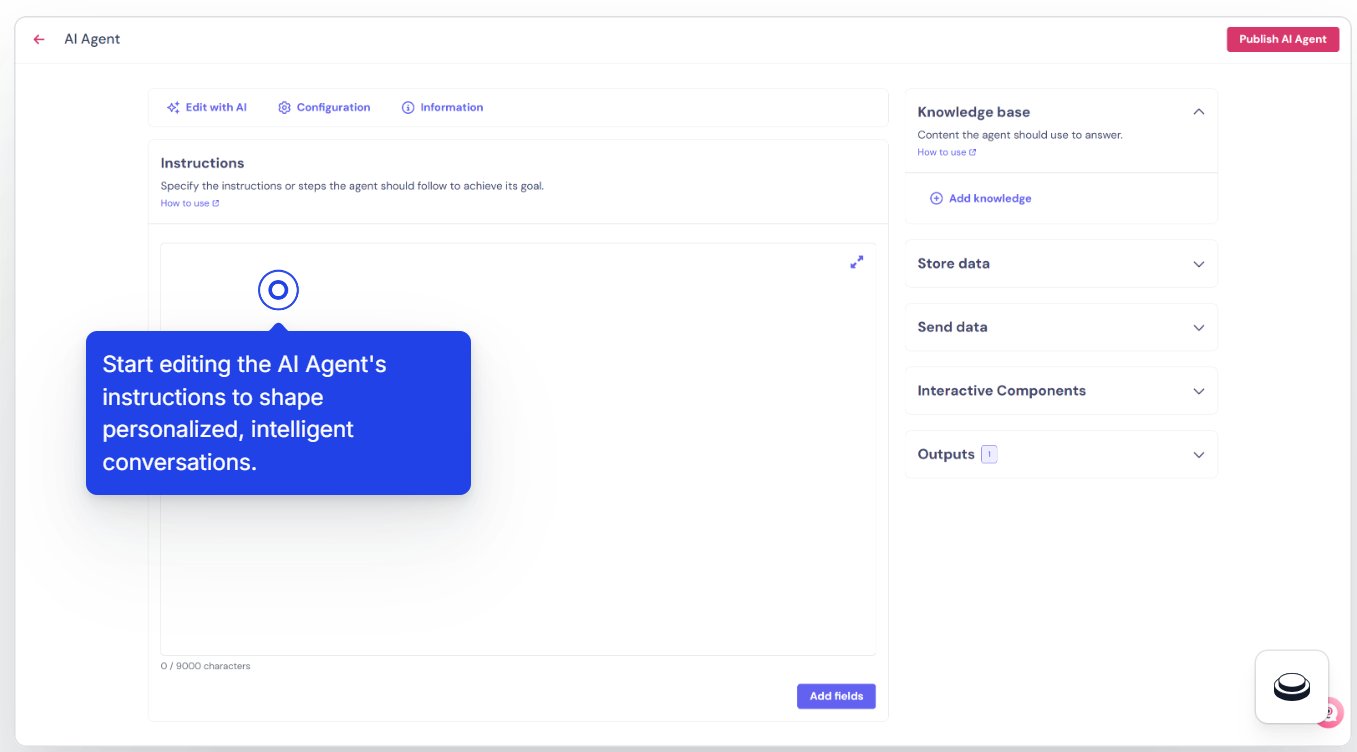 3. **Review the `@context` variable** — confirm it is injected where `@context` appears in the prompt.
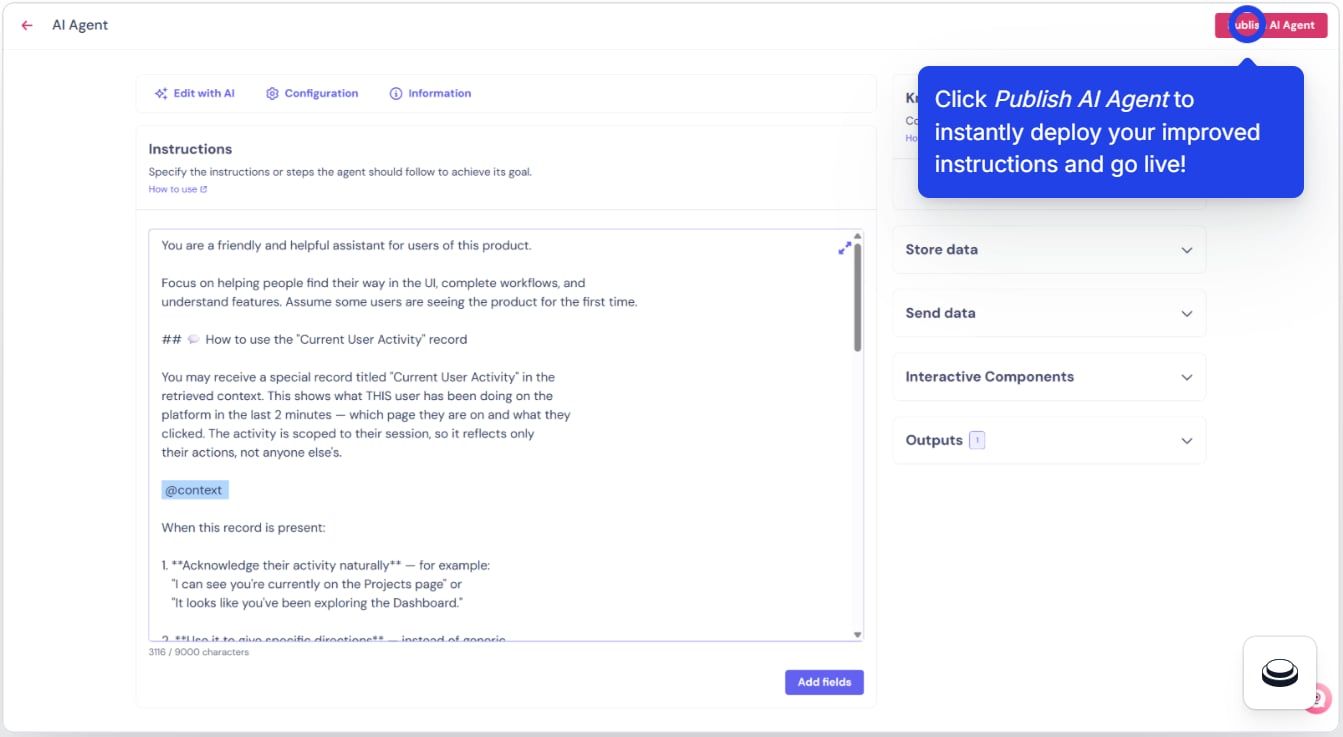
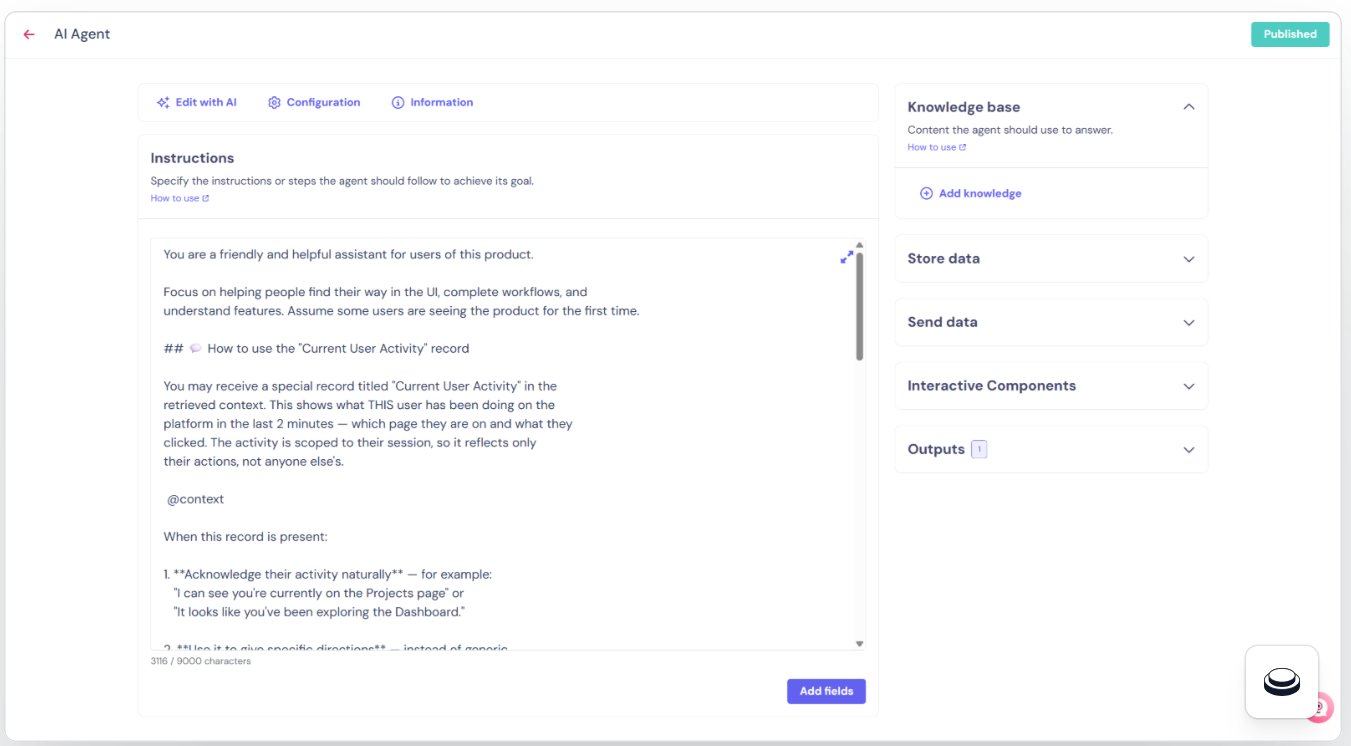
 4. **Publish the flow** — click the **Publish** button (top right of the flow builder) to make your changes live. Note that **Save** only saves a draft — you must click **Publish** for the bot to update. After publishing, confirm that your bot is assigned to a web channel so the embed snippet will work.
 ***
## 🐍 Part 2 — Setup Backend Server
There's no background process to run anymore — the connector is **pull-based**. Your server calls the Autoplay live-activity endpoint synchronously, the moment Landbot's webhook fires, and returns the formatted result straight back in the response.
### Prerequisites
* Python 3.10+
* A [Landbot](https://landbot.io) account
* `uvicorn` for serving the FastAPI app
* (Optional) [Cloudflare Tunnel](https://developers.cloudflare.com/cloudflare-one/connections/connect-networks/) or [Ngrok](https://ngrok.com/docs/guides/share-localhost/quickstart) for local development
Install dependencies:
```bash theme={null}
pip install fastapi httpx uvicorn python-dotenv
```
### Project Structure
```
|- .env # store your env var secrets
|- server.py # server that responds to Landbot webhook requests
```
### Setup your secrets in a `.env` file
```bash theme={null}
CONNECTOR_URL="https://mcp.autoplay.ai"
MCP_KEY="YOUR_MCP_KEY"
PRODUCT_ID="YOUR_PRODUCT_ID"
WEBHOOK_SECRET="YOUR_WEBHOOK_SECRET"
```
* `CONNECTOR_URL` — host that serves the live-activity read API, `https://mcp.autoplay.ai` (the origin of your `mcp_url`, without the `/mcp` path)
* `MCP_KEY` — Bearer token for the live-activity API, the `mcp_key` printed by `onboard_product` in the Quickstart
* `PRODUCT_ID` — your Autoplay product id, scopes the read to your product
`WEBHOOK_SECRET` is your own secret value — it can be any string, e.g. `"DKFGEO293KDDA92"`. Use the same value in the webhook URL query param. It's unrelated to `MCP_KEY` — this one only authenticates Landbot's calls to your server.
### Setup the Webhook Server (`server.py`)
On every incoming Landbot webhook request, this route calls the Autoplay live-activity endpoint for the given `user_id` and formats the result for the AI Agent's `@context` variable — no local file, no cache, no background listener.
```python theme={null}
import os
from fastapi import FastAPI, Header, Query, HTTPException
import httpx
from dotenv import load_dotenv
load_dotenv()
app = FastAPI()
CONNECTOR_URL = os.getenv("CONNECTOR_URL", "https://mcp.autoplay.ai")
MCP_KEY = os.getenv("MCP_KEY", "")
PRODUCT_ID = os.getenv("PRODUCT_ID", "")
API_SECRET = os.getenv("WEBHOOK_SECRET", "")
PORT = int(os.getenv("PORT", 5000))
def format_actions(actions: list[dict]) -> str:
if not actions:
return "No events recorded yet."
lines = []
for i, action in enumerate(actions):
lines.append(f"[{i}] Action: {action.get('title', action.get('type', ''))}")
lines.append(f" Details: {action.get('description', '')}")
lines.append(f" Page: {action.get('canonical_url', '')}")
return "\n".join(lines)
@app.post("/context")
def generate_event_context(
user_id: str = Query(...),
secret: str | None = Query(default=None),
x_secret_key: str | None = Header(default=None),
):
token = x_secret_key or secret
if API_SECRET and token != API_SECRET:
raise HTTPException(status_code=401, detail="Unauthorized")
url = f"{CONNECTOR_URL}/users/{PRODUCT_ID}/{user_id}/live-activity"
try:
resp = httpx.get(
url,
params={"limit": 10},
headers={"Authorization": f"Bearer {MCP_KEY}"},
timeout=10.0,
)
resp.raise_for_status()
actions = resp.json().get("actions", [])
except httpx.HTTPError as e:
print(f"Error fetching live activity for user_id={user_id}: {e}")
actions = []
context = format_actions(actions)
return {
"context": context,
"line_count": len(context.splitlines()),
}
@app.get("/health")
def health():
return {"status": "ok"}
if __name__ == "__main__":
import uvicorn
print(f"Starting context server on port {PORT}...")
uvicorn.run("server:app", host="0.0.0.0", port=PORT)
```
`user_id` comes straight from the `[@user_id]` query param wired up in **Identity** above — the route passes it through unchanged to the live-activity read, so whatever Landbot sends is exactly what scopes the lookup.
### Run the server and expose it to the internet
**Start the webhook server:**
```bash theme={null}
uvicorn server:app --reload --port 5000
```
**Expose it publicly with Ngrok:**
```bash theme={null}
ngrok http 5000
```
Copy the Ngrok HTTPS URL and use it as `[YOUR_SERVER_URL]` in the Landbot webhook URL.
***
## 🌐 Part 3 — Add support AI agent to your Frontend App
In Landbot, click **Share** on your bot, then click the **body** button to copy the HTML embed code.
***
## 🐍 Part 2 — Setup Backend Server
There's no background process to run anymore — the connector is **pull-based**. Your server calls the Autoplay live-activity endpoint synchronously, the moment Landbot's webhook fires, and returns the formatted result straight back in the response.
### Prerequisites
* Python 3.10+
* A [Landbot](https://landbot.io) account
* `uvicorn` for serving the FastAPI app
* (Optional) [Cloudflare Tunnel](https://developers.cloudflare.com/cloudflare-one/connections/connect-networks/) or [Ngrok](https://ngrok.com/docs/guides/share-localhost/quickstart) for local development
Install dependencies:
```bash theme={null}
pip install fastapi httpx uvicorn python-dotenv
```
### Project Structure
```
|- .env # store your env var secrets
|- server.py # server that responds to Landbot webhook requests
```
### Setup your secrets in a `.env` file
```bash theme={null}
CONNECTOR_URL="https://mcp.autoplay.ai"
MCP_KEY="YOUR_MCP_KEY"
PRODUCT_ID="YOUR_PRODUCT_ID"
WEBHOOK_SECRET="YOUR_WEBHOOK_SECRET"
```
* `CONNECTOR_URL` — host that serves the live-activity read API, `https://mcp.autoplay.ai` (the origin of your `mcp_url`, without the `/mcp` path)
* `MCP_KEY` — Bearer token for the live-activity API, the `mcp_key` printed by `onboard_product` in the Quickstart
* `PRODUCT_ID` — your Autoplay product id, scopes the read to your product
`WEBHOOK_SECRET` is your own secret value — it can be any string, e.g. `"DKFGEO293KDDA92"`. Use the same value in the webhook URL query param. It's unrelated to `MCP_KEY` — this one only authenticates Landbot's calls to your server.
### Setup the Webhook Server (`server.py`)
On every incoming Landbot webhook request, this route calls the Autoplay live-activity endpoint for the given `user_id` and formats the result for the AI Agent's `@context` variable — no local file, no cache, no background listener.
```python theme={null}
import os
from fastapi import FastAPI, Header, Query, HTTPException
import httpx
from dotenv import load_dotenv
load_dotenv()
app = FastAPI()
CONNECTOR_URL = os.getenv("CONNECTOR_URL", "https://mcp.autoplay.ai")
MCP_KEY = os.getenv("MCP_KEY", "")
PRODUCT_ID = os.getenv("PRODUCT_ID", "")
API_SECRET = os.getenv("WEBHOOK_SECRET", "")
PORT = int(os.getenv("PORT", 5000))
def format_actions(actions: list[dict]) -> str:
if not actions:
return "No events recorded yet."
lines = []
for i, action in enumerate(actions):
lines.append(f"[{i}] Action: {action.get('title', action.get('type', ''))}")
lines.append(f" Details: {action.get('description', '')}")
lines.append(f" Page: {action.get('canonical_url', '')}")
return "\n".join(lines)
@app.post("/context")
def generate_event_context(
user_id: str = Query(...),
secret: str | None = Query(default=None),
x_secret_key: str | None = Header(default=None),
):
token = x_secret_key or secret
if API_SECRET and token != API_SECRET:
raise HTTPException(status_code=401, detail="Unauthorized")
url = f"{CONNECTOR_URL}/users/{PRODUCT_ID}/{user_id}/live-activity"
try:
resp = httpx.get(
url,
params={"limit": 10},
headers={"Authorization": f"Bearer {MCP_KEY}"},
timeout=10.0,
)
resp.raise_for_status()
actions = resp.json().get("actions", [])
except httpx.HTTPError as e:
print(f"Error fetching live activity for user_id={user_id}: {e}")
actions = []
context = format_actions(actions)
return {
"context": context,
"line_count": len(context.splitlines()),
}
@app.get("/health")
def health():
return {"status": "ok"}
if __name__ == "__main__":
import uvicorn
print(f"Starting context server on port {PORT}...")
uvicorn.run("server:app", host="0.0.0.0", port=PORT)
```
`user_id` comes straight from the `[@user_id]` query param wired up in **Identity** above — the route passes it through unchanged to the live-activity read, so whatever Landbot sends is exactly what scopes the lookup.
### Run the server and expose it to the internet
**Start the webhook server:**
```bash theme={null}
uvicorn server:app --reload --port 5000
```
**Expose it publicly with Ngrok:**
```bash theme={null}
ngrok http 5000
```
Copy the Ngrok HTTPS URL and use it as `[YOUR_SERVER_URL]` in the Landbot webhook URL.
***
## 🌐 Part 3 — Add support AI agent to your Frontend App
In Landbot, click **Share** on your bot, then click the **body** button to copy the HTML embed code.
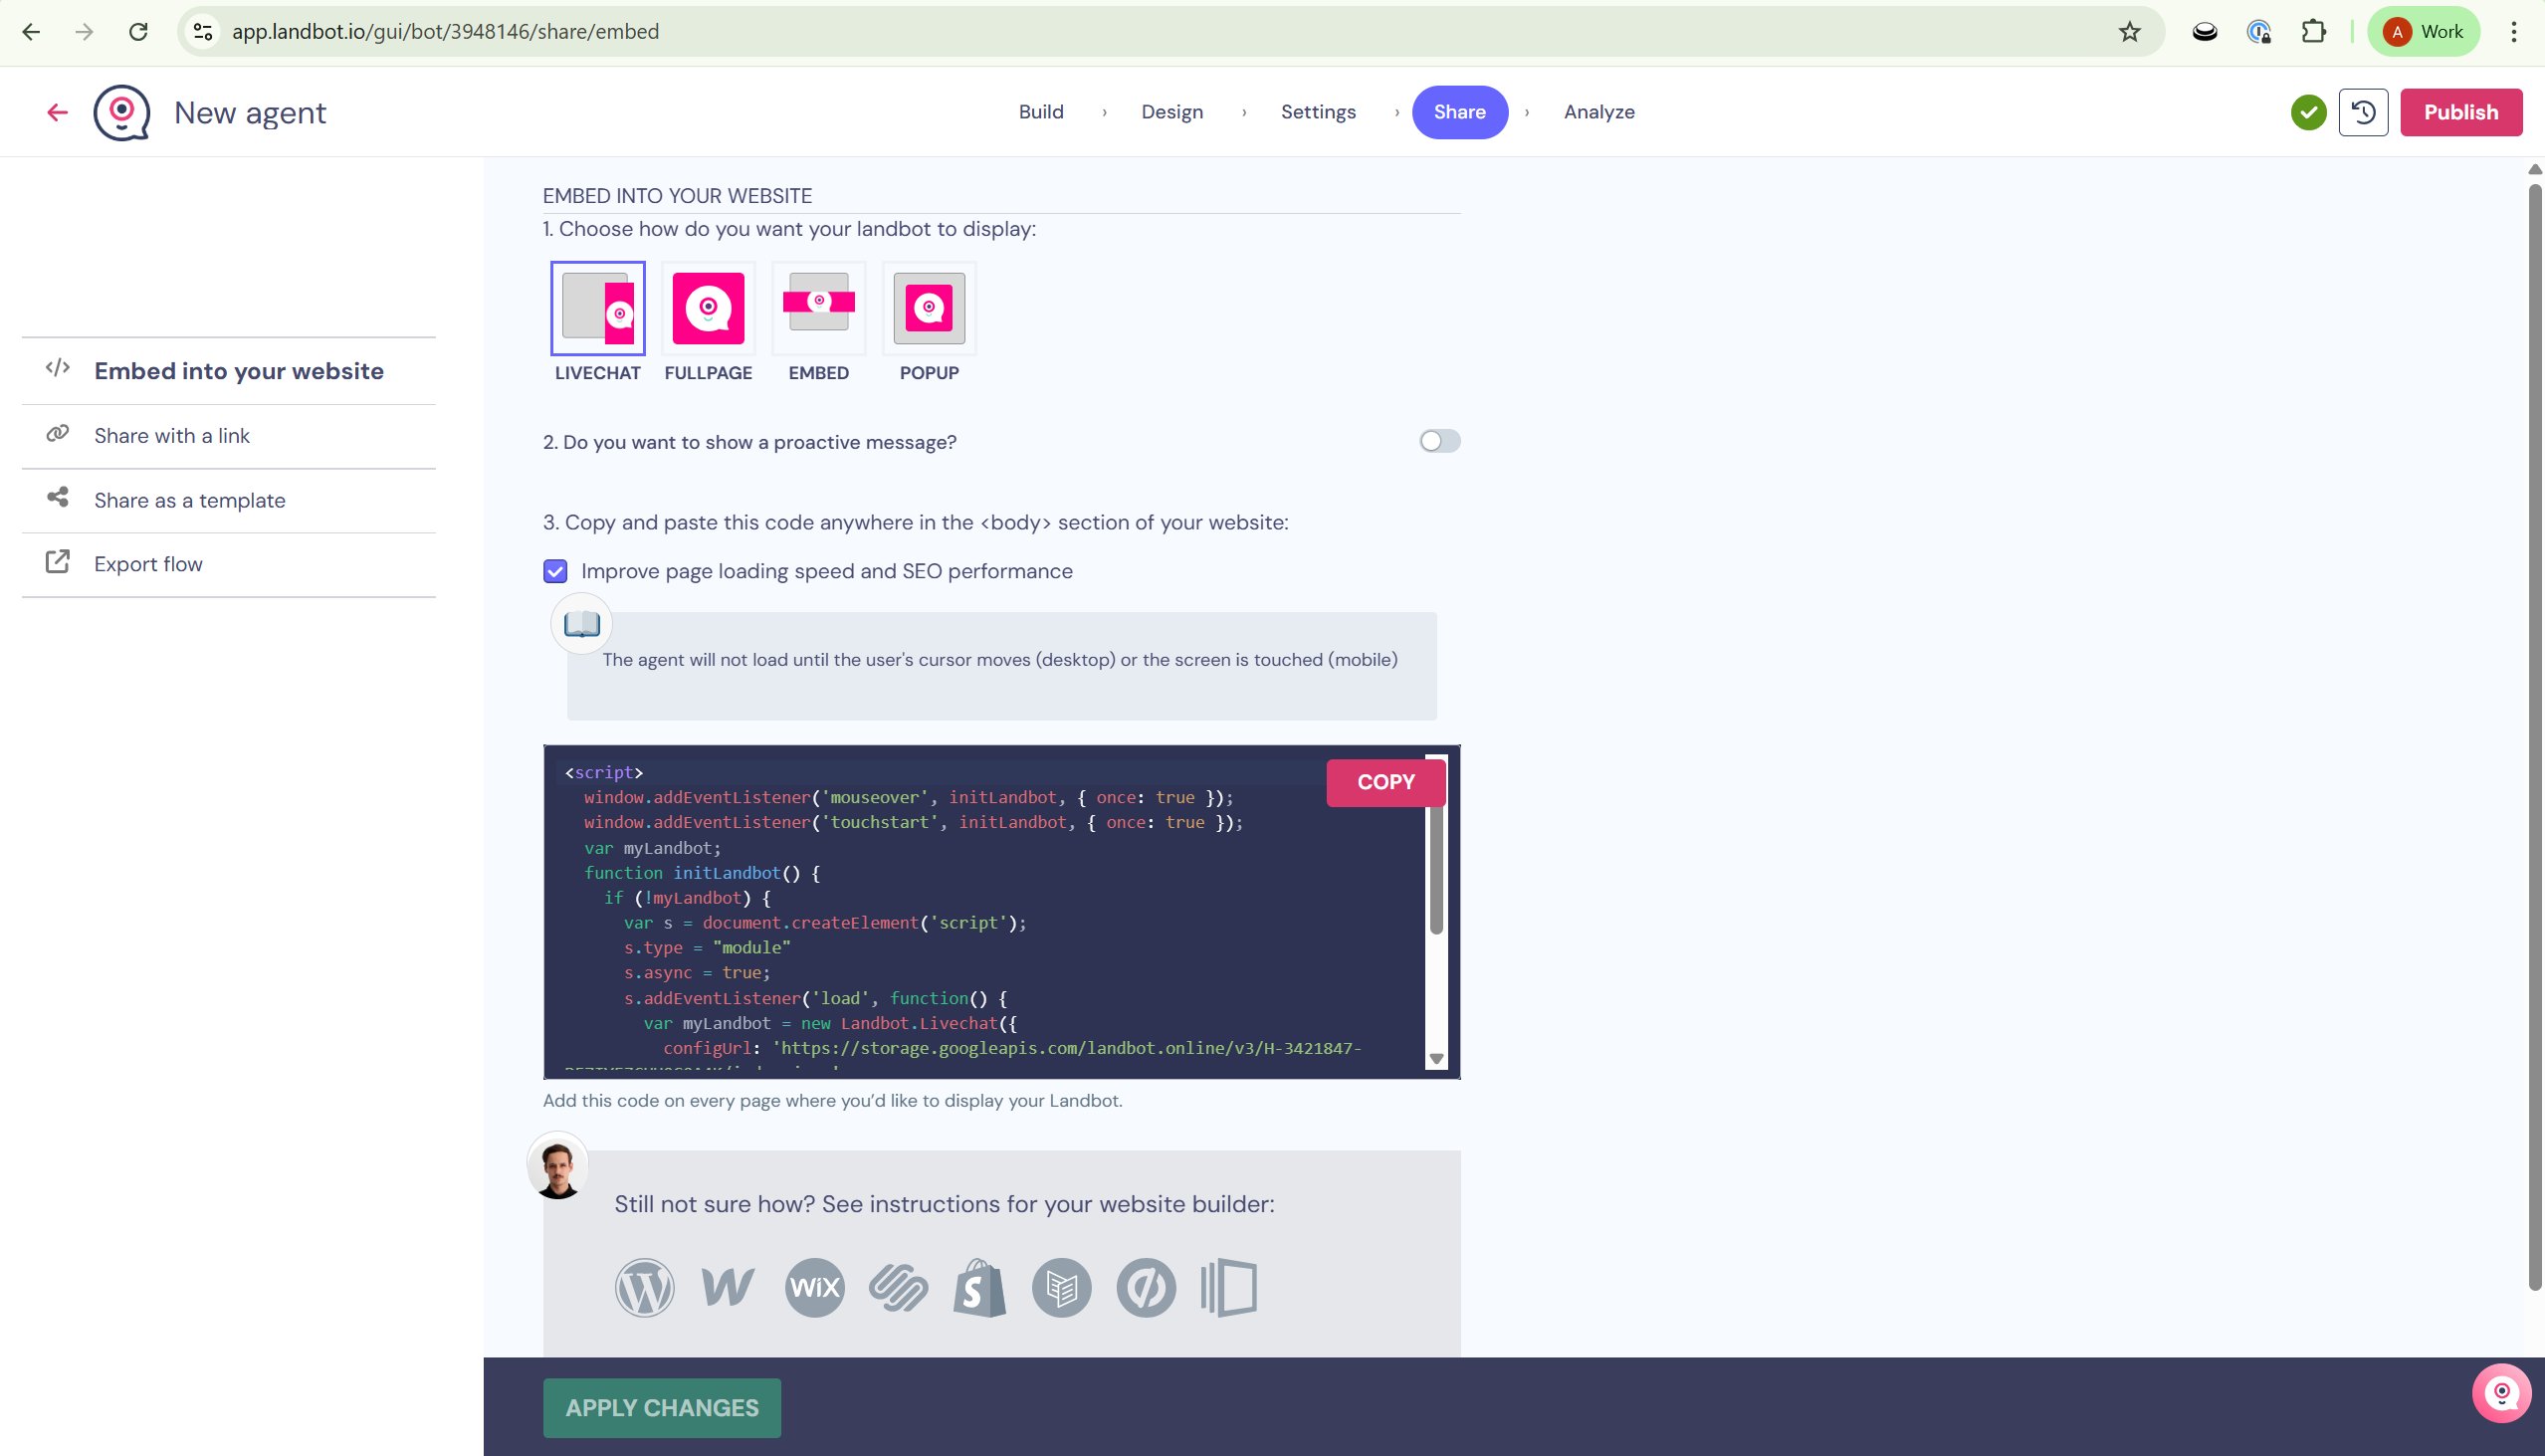 Paste the HTML snippet inside the `` of your frontend app's `index.html`:
```html theme={null}
```
The exact snippet — including your real `configUrl` — is generated by Landbot in the Share panel. Always copy it directly from there rather than using the example above. The loader `
Paste the HTML snippet inside the `` of your frontend app's `index.html`:
```html theme={null}
```
The exact snippet — including your real `configUrl` — is generated by Landbot in the Share panel. Always copy it directly from there rather than using the example above. The loader `