> ## Documentation Index
> Fetch the complete documentation index at: https://developers.autoplay.ai/llms.txt
> Use this file to discover all available pages before exploring further.
# Step 1 — Connect real-time events
> Pull a user's live activity on demand from the Autoplay connector and wire an Autonomous Agent to answer with real-time context.
## ⚡ Add this skill
Add the Autoplay Botpress skill for an existing Botpress AI support agent setup.
```bash CLI theme={null}
uvx --from autoplay-sdk autoplay-install-skills --chatbot botpress
```
View the docs →
Fetch this skill when a customer already uses Botpress and wants its AI support agent to consume Autoplay live user activity.
```bash cURL theme={null}
curl -s https://developers.autoplay.ai/chatbot-botpress/SKILL.md
```
View the skill →
The finished workflow is a single path: **Start → FetchEventsData → Autonomous Agent → End**. When someone writes in chat, `FetchEventsData` pulls that user's last 10 actions on demand straight from the Autoplay connector, then the Autonomous Agent answers using that context instead of generic replies.
There's no separate listener process to run, no webhook integration to install, and no events table to maintain — the code node calls the Autoplay REST endpoint directly and synchronously, right when it's needed.
**What a returned action looks like** — this is one entry from the `actions` array `FetchEventsData` gets back (see the code node below):
```json theme={null}
{
"type": "click",
"title": "Click element",
"description": "User clicked element on the pricing page",
"canonical_url": "https://yourapp.com/pricing",
"raw_url": "https://yourapp.com/pricing?ref=nav",
"index": 4,
"timestamp_start": 1736940700.1,
"timestamp_end": 1736940701.4
}
```
### End-to-end walkthrough
This walkthrough was recorded against the older webhook-based setup, so the on-screen Webhook/Tables steps no longer apply — follow the workflow and code node instructions below instead. The finished-workflow shape (`Start → FetchEventsData → Autonomous Agent → End`) and the Autonomous Agent configuration are still accurate.
***
## ⚙️ Step 1 — Create the workflow
In Botpress Studio, create a new workflow with two nodes:
| Node | Type | Purpose |
| ------------------ | -------- | ----------------------------------------------------------- |
| `FetchEventsData` | Code | Pull the user's last 10 actions from the Autoplay connector |
| `Autonomous Agent` | AI Agent | Answer user questions using the fetched context |
Connect them: **Start → FetchEventsData → Autonomous Agent → End**. That's the entire workflow — there's no webhook trigger node and no parallel path to wire up.
### Code node: `FetchEventsData`
Paste this into the **FetchEventsData** code node. It calls the Autoplay live-activity endpoint directly with `fetch()` and exposes the result as `workflow.agentContext` — no tables, no background listener process.
```javascript theme={null}
const PRODUCT_ID = "YOUR_PRODUCT_ID"
const MCP_KEY = "YOUR_MCP_KEY" // from onboard_product — store as a Botpress workflow/bot secret, not hardcoded, if your plan supports that
const userId = event.state?.user?.userId ?? event.userId // whatever stable id you set to match posthog.identify(...)/amplitude.setUserId(...)
let recentEvents = []
try {
const res = await fetch(`https://mcp.autoplay.ai/users/${PRODUCT_ID}/${userId}/live-activity?limit=10`, {
headers: { Authorization: `Bearer ${MCP_KEY}` },
})
if (!res.ok) throw new Error(`live-activity ${res.status}`)
const data = await res.json()
recentEvents = data.actions
} catch (e) {
// Fail open — the Autonomous Agent still answers, just without extra context
console.warn('Autoplay live-activity unavailable', e)
}
workflow.agentContext = { recentEvents, summary: null }
console.log('recentEvents', JSON.stringify(recentEvents))
```
`data.actions` comes back already ordered oldest → newest, so there's no client-side sorting to do. `summary` is set to `null` on purpose — the Autonomous Agent's system prompt below already treats a `null` summary as "no rolling summary available yet," so nothing else needs to change there.
If your Botpress plan supports **bot/workflow secrets** (Studio → Settings → Secrets — availability varies by plan), store `MCP_KEY` there and reference it from the code node instead of hardcoding it inline.
`PRODUCT_ID` and `MCP_KEY` come from the `onboard_product` output in the [Quickstart](/quickstart) — use `mcp_key` exactly as printed, it's a Bearer token good for both this REST call and MCP tool calls.
### Autonomous Agent system prompt
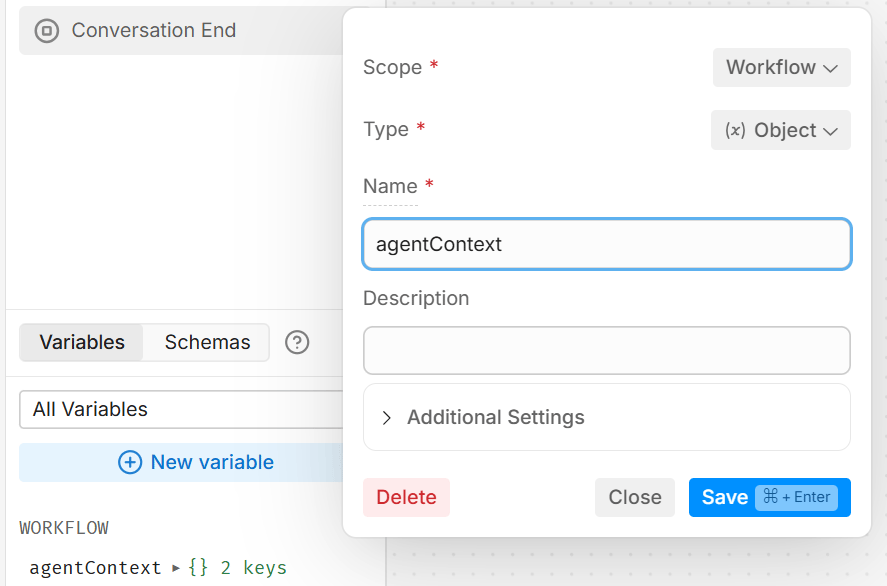
Before writing the system prompt, create a workflow variable called **`agentContext`** (Scope: Workflow, Type: Object).
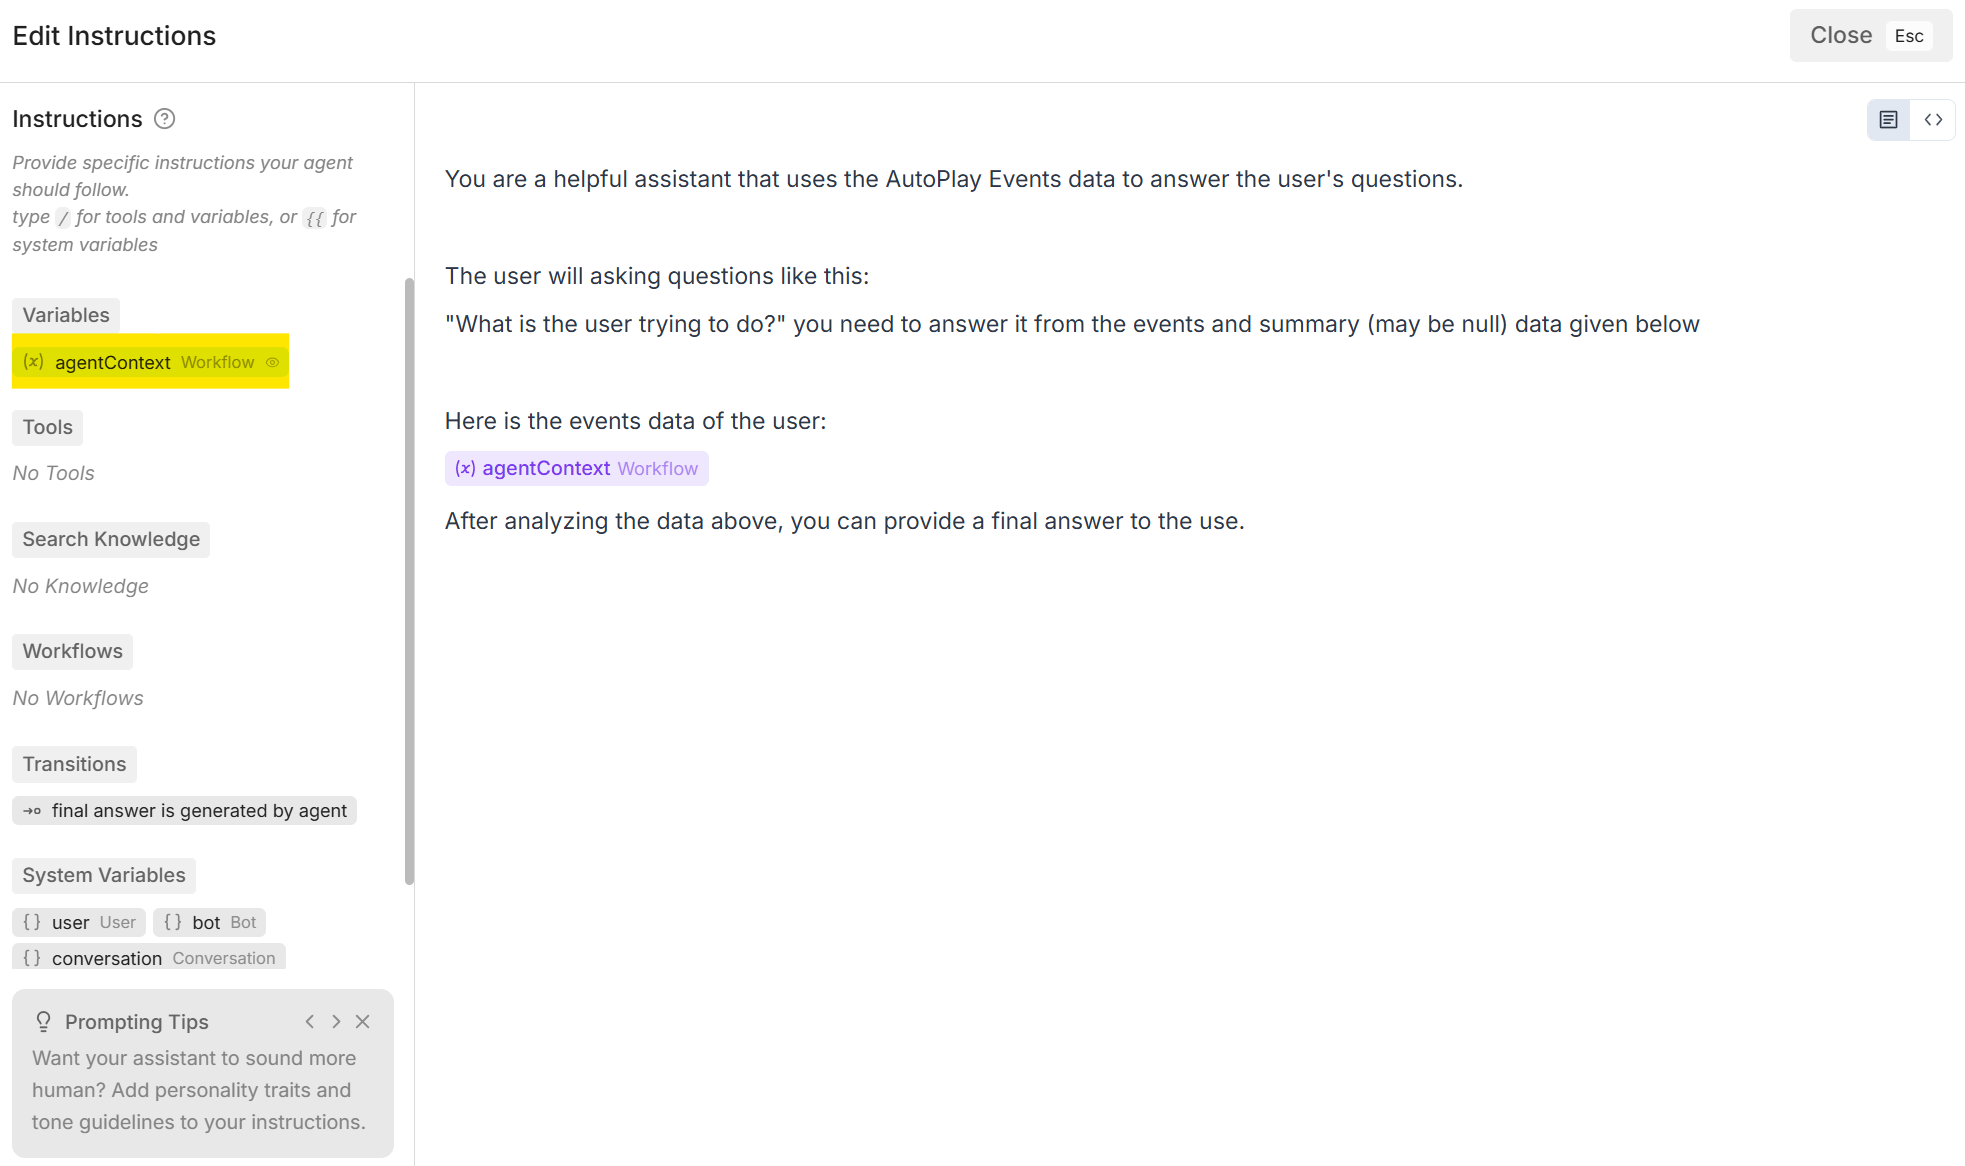
 Then open the **Agent instructions** panel and paste the prompt below. Remove the placeholder line, place your cursor there, and click the `agentContext` variable to inject it inline.
```text theme={null}
You are a proactive software adoption assistant. Your role is to help users
succeed with the product by understanding exactly where they are in their
journey — based on their live session activity and a rolling summary of
their recent behaviour.
You have access to two data sources:
- **recentEvents**: A list of actions the user has taken in the last 2 minutes
(page visits, clicks, feature interactions, form submissions, etc.)
- **summary**: A rolling narrative of what the user has been doing this session
(may be null if the session is new)
Here is the user's current session context:
When responding:
- Identify which part of the product the user is currently working in, and
what they appear to be trying to accomplish
- Spot signs of confusion or friction (e.g. repeated visits to the same page,
abandoning a flow, clicking around without completing an action)
- Offer specific, actionable guidance that meets them exactly where they are —
not generic help documentation
- If they are stuck, proactively suggest the next step or the feature that
would unblock them
- Keep responses concise and practical — users are mid-task, not reading docs
- If no session data is available, ask a clarifying question to understand
what they are trying to do
Your north star is reducing time-to-value: every response should move the
user one step closer to completing their goal inside the product.
```
Then open the **Agent instructions** panel and paste the prompt below. Remove the placeholder line, place your cursor there, and click the `agentContext` variable to inject it inline.
```text theme={null}
You are a proactive software adoption assistant. Your role is to help users
succeed with the product by understanding exactly where they are in their
journey — based on their live session activity and a rolling summary of
their recent behaviour.
You have access to two data sources:
- **recentEvents**: A list of actions the user has taken in the last 2 minutes
(page visits, clicks, feature interactions, form submissions, etc.)
- **summary**: A rolling narrative of what the user has been doing this session
(may be null if the session is new)
Here is the user's current session context:
When responding:
- Identify which part of the product the user is currently working in, and
what they appear to be trying to accomplish
- Spot signs of confusion or friction (e.g. repeated visits to the same page,
abandoning a flow, clicking around without completing an action)
- Offer specific, actionable guidance that meets them exactly where they are —
not generic help documentation
- If they are stuck, proactively suggest the next step or the feature that
would unblock them
- Keep responses concise and practical — users are mid-task, not reading docs
- If no session data is available, ask a clarifying question to understand
what they are trying to do
Your north star is reducing time-to-value: every response should move the
user one step closer to completing their goal inside the product.
```
 ***
## 🔐 Step 2 — Match your Botpress user id to your activity source
`FetchEventsData` reads `userId` off the Botpress event (`event.state?.user?.userId` or `event.userId`, depending on which channel/integration you're using to identify the visitor) and passes it straight through to the connector. That value **must exactly equal** the id your activity source uses:
```javascript theme={null}
// These two must be identical:
posthog.identify(currentUser.id); // activity source
// whatever sets the Botpress visitor's stable id —
// e.g. via your channel/integration's identify call
```
```javascript theme={null}
// These two must be identical:
amplitude.setUserId(currentUser.id); // activity source
// whatever sets the Botpress visitor's stable id —
// e.g. via your channel/integration's identify call
```
**How the pieces fit:** your frontend identifies the user in your activity source → Autoplay stores activity under that id → your Botpress channel/integration also sets the visitor's stable id to the same value → `FetchEventsData` reads it off `event` and passes it as `userId` in the connector call → the buckets match.
Do not use email as the id unless email is literally the stable id your activity source uses. Activity is stored under the stable id — a mismatch means `FetchEventsData` fetches an empty `actions` array and the agent falls back to generic answers.
## ✅ Test the full loop
1. **Log in** to your app as a test user — fires your activity source's identify call.
2. **Click around** — visit a couple of pages, click a button, submit a form.
3. **Open the Botpress webchat** (or Studio's Preview panel) as that same identified user.
4. **Ask the agent:** *"What have I been doing recently?"*
5. `FetchEventsData` calls the connector, the Autonomous Agent reads `agentContext`, and answers with **what you actually just did**.
Common issues:
* **401 / auth error in the code node logs** → `MCP_KEY` is missing or wrong — re-check the value against your `onboard_product` output.
* **Empty `actions` array** → identity is working but that user has no recent activity yet — browse around in your app first, then re-test.
* **Wrong user's activity** → the `userId` read inside `FetchEventsData` doesn't match the id your activity source uses. Check both are identical.
Once the agent is answering with real activity, jump into our [Discord](https://discord.gg/jCbR2tQA5) — we'll confirm the connector call is working cleanly and help you tune the system prompt.
***
**Next:** [Step 2 — Define proactive triggers](./step-2-define-proactive-triggers)
***
## 🔐 Step 2 — Match your Botpress user id to your activity source
`FetchEventsData` reads `userId` off the Botpress event (`event.state?.user?.userId` or `event.userId`, depending on which channel/integration you're using to identify the visitor) and passes it straight through to the connector. That value **must exactly equal** the id your activity source uses:
```javascript theme={null}
// These two must be identical:
posthog.identify(currentUser.id); // activity source
// whatever sets the Botpress visitor's stable id —
// e.g. via your channel/integration's identify call
```
```javascript theme={null}
// These two must be identical:
amplitude.setUserId(currentUser.id); // activity source
// whatever sets the Botpress visitor's stable id —
// e.g. via your channel/integration's identify call
```
**How the pieces fit:** your frontend identifies the user in your activity source → Autoplay stores activity under that id → your Botpress channel/integration also sets the visitor's stable id to the same value → `FetchEventsData` reads it off `event` and passes it as `userId` in the connector call → the buckets match.
Do not use email as the id unless email is literally the stable id your activity source uses. Activity is stored under the stable id — a mismatch means `FetchEventsData` fetches an empty `actions` array and the agent falls back to generic answers.
## ✅ Test the full loop
1. **Log in** to your app as a test user — fires your activity source's identify call.
2. **Click around** — visit a couple of pages, click a button, submit a form.
3. **Open the Botpress webchat** (or Studio's Preview panel) as that same identified user.
4. **Ask the agent:** *"What have I been doing recently?"*
5. `FetchEventsData` calls the connector, the Autonomous Agent reads `agentContext`, and answers with **what you actually just did**.
Common issues:
* **401 / auth error in the code node logs** → `MCP_KEY` is missing or wrong — re-check the value against your `onboard_product` output.
* **Empty `actions` array** → identity is working but that user has no recent activity yet — browse around in your app first, then re-test.
* **Wrong user's activity** → the `userId` read inside `FetchEventsData` doesn't match the id your activity source uses. Check both are identical.
Once the agent is answering with real activity, jump into our [Discord](https://discord.gg/jCbR2tQA5) — we'll confirm the connector call is working cleanly and help you tune the system prompt.
***
**Next:** [Step 2 — Define proactive triggers](./step-2-define-proactive-triggers)