> ## Documentation Index
> Fetch the complete documentation index at: https://developers.autoplay.ai/llms.txt
> Use this file to discover all available pages before exploring further.
# Amplitude — How to setup
> Learn how to stream live user activity from Amplitude into Autoplay to give your support AI agent real-time context on what every user is doing.
## ⚡ Add this skill
Add the Autoplay Amplitude session replay provider skill for an existing Amplitude setup.
```bash CLI theme={null}
uvx --from autoplay-sdk autoplay-install-skills --user-activity amplitude
```
View the docs →
Fetch this skill when a customer already uses Amplitude as a session replay provider and wants Autoplay live user activity.
```bash cURL theme={null}
curl -s https://developers.autoplay.ai/activity-amplitude/SKILL.md
```
View the skill →
**Prerequisite:** install the SDK first — see [Quickstart](/quickstart).
This guide assumes you **already have Amplitude set up** and capturing events in your app. If you don't yet, sign up and create a project at [amplitude.com](https://amplitude.com) — see [Amplitude's getting-started docs](https://amplitude.com/docs/get-started/amplitude-quickstart) for account/project setup — then come back here.
**What Autoplay needs from your Amplitude project:**
* **API Key** — already in your `amplitude.initAll()` call (Step 2 below). Find it under **Settings → Projects → \[Your Project] → General** if you need to re-verify it.
* **Project ID** — links your Amplitude project to the Autoplay product Autoplay will issue (**Settings → Projects → select your project → Project ID**; used in Step 4).
If you're setting up a **brand-new** Amplitude project, note that Amplitude shows a **"Let's get set up!"** screen with **"Waiting for your events..."** at the bottom, and blocks **Data → Destinations** until it's dismissed. Complete Steps 1–3 below to send first events, then click **"Finish Setup"** — or **"Skip for now"** to go straight to the dashboard. This doesn't apply if Amplitude is already live in your app.
***
### 🎯 Step 1 — Verify the existing Amplitude SDK
Confirm your app already has `@amplitude/unified` installed with Analytics and Session Replay enabled — this is the one that bundles both in one package, which Autoplay needs (Session Replay lets Autoplay correlate what users actually did on screen with your support AI agent conversations). If you're on the older `@amplitude/analytics-browser` package instead, that's a migration decision — see [Amplitude's browser SDK docs](https://amplitude.com/docs/sdks/analytics/browser/browser-sdk-2).
Don't have it installed yet? Run this in your frontend app's directory:
```bash theme={null}
npm install @amplitude/unified
```
**📺 Full setup walkthrough**
Once the SDK is wired up, on a brand-new project, copy the setup script Amplitude shows on its **"Let's get set up!"** screen (right next to your API key) into your app, then open your app and click around a few pages so Amplitude actually receives events. That screen shows **"Waiting for your events..."** at the bottom until events arrive, then unlocks **Finish Setup**. Complete this before moving on, so **Data → Destinations** is available in Step 5.
***
### 💻 Step 2 — Verify initialization and autocapture
**This step is required before you can create a destination in Step 5.** Amplitude only shows the **Data → Destinations** section and the destination catalog after it has received at least one live event from your app.
Your app should already call `amplitude.initAll()` once at startup (`main.ts`, `_app.tsx`, or root layout) — see [Amplitude's browser SDK docs](https://amplitude.com/docs/sdks/analytics/browser/browser-sdk-2) for the general init pattern and where to find your API key if you need to check it.
**📺 Copy your Amplitude API key**
Confirm your existing `initAll()` call has `autocapture: true` set — this is the one setting Autoplay actually requires:
```typescript theme={null}
amplitude.initAll('YOUR_AMPLITUDE_API_KEY', {
analytics: { autocapture: true }, // required — without this, no click/pageview events reach Autoplay
sessionReplay: { sampleRate: 1 },
});
```
If Amplitude isn't already showing events for your app, send it some first: open your app, click around a few pages, and confirm under **Activity → Live Events**. (On a brand-new project, this also unlocks **Data → Destinations** — click **"Finish Setup"** once events appear.)
***
### 👤 Step 3 — Identify on login (required for session scoping)
Add this to your auth/login handler — wherever your app handles a successful login. `setUserId` is the key step: it stamps every event with a stable `user_id`, and the connector keys a user's activity under exactly that id — the same one your agent will look them up by.
Without `setUserId`, events carry only a `device_id` — the connector still records activity, but keyed by `device_id`, so your agent won't find the user by their real id. Always call `setUserId` on login.
```typescript theme={null}
import * as amplitude from '@amplitude/unified';
amplitude.setUserId(user.id); // the stable id your agent reads activity by
const identifyObj = new amplitude.Identify();
identifyObj.set('email', user.email);
identifyObj.set('name', user.name);
identifyObj.set('plan', user.plan); // e.g. "trial" — lets your agent see plan status alongside activity
// Optional: only if you're segmenting who should receive the Autoplay experience.
// Replace this condition with your own rule: plan, signup date, feature flag,
// experiment assignment, workspace type, region, or any other property.
const shouldReceiveAutoplay = isInAutoplayExperiment(user);
identifyObj.set('autoplay_experiment_group', shouldReceiveAutoplay ? 'autoplay' : 'comparison');
identifyObj.set('autoplay_experiment_id', 'your-experiment-id');
amplitude.identify(identifyObj);
```
**Running an Autoplay experiment?** Set custom Amplitude user properties based on whatever condition decides eligibility. That condition could be `plan`, a feature flag, an experiment assignment, signup source, workspace type, region, or a combination of fields. After Amplitude receives the identify call and a later event for that user, these custom properties appear in Amplitude as user properties and can be used in destination filters.
***
### 📝 Step 4 — Register your product with Autoplay
Now that your app is capturing events, we need to create a secure "ingest\_url" and a shared secret (`ingest_secret`) so that data can be safely sent to Autoplay.
**Where to find your Amplitude Project ID:** In Amplitude, go to **Settings → Projects → select your project → Project ID**. Copy the numeric ID shown there — you'll use it as `YOUR_AMPLITUDE_PROJECT_ID` below.
**📺 How to find your Amplitude Project ID**
The `autoplay-sdk` was installed on the [Quickstart](/quickstart) page. Create a Python file with the script below, replace the placeholders with your values, and run it once:
```python theme={null}
import asyncio
from autoplay_sdk.admin import onboard_product
from autoplay_sdk.providers import AmplitudeProvider
async def main() -> None:
result = await onboard_product(
"YOUR_AMPLITUDE_PROJECT_ID", # your Amplitude project ID from above
contact_email="you@yourcompany.com", # replace with your actual email
user_activity_provider=AmplitudeProvider(),
print_operator_summary=True,
)
asyncio.run(main())
```
This will print the following fields:
* **product\_id:** `prod_wQ7r8kF9...` — the issued Autoplay id
* **provider:** `amplitude`
* **provider\_project\_id:** `YOUR_AMPLITUDE_PROJECT_ID`
* **ingest\_url:** `https://connector.autoplay.ai/ingest/prod__EpnUILl...`
* **ingest\_secret:** `{secret}` — Amplitude sends this as `Authorization: Bearer `
* **mcp\_url:** `https://mcp.autoplay.ai/mcp`
* **mcp\_key:** `{secret}` — your agent's Bearer token
* **owner\_token:** `{secret}` — shown only on first registration; save it securely
**Save what prints in the terminal** — you will need `ingest_url` and `ingest_secret` in Step 5 below, `product_id` and `mcp_key` when you connect your AI support agent, and `owner_token` if you ever need to re-register or rotate credentials.
**Re-registering your product**
A second `onboard_product` with the same provider/project pair returns **409** unless you pass the saved **`owner_token`**. Re-run with `owner_token=""`; you must still pass **`contact_email`** on every registration.
***
### ⚙️ Step 5 — Create the event streaming destination in Amplitude
You'll need two values printed by Step 4:
* **URL:** `ingest_url` (e.g. `https://connector.autoplay.ai/ingest/prod__EpnUILl...`)
* **Bearer token:** `ingest_secret` — you'll paste this directly into the `Authorization` header below
**📺 How to create the Amplitude event streaming destination**
**It can take a little while for the destination to appear.** After you save your configuration, look for it under **New Destinations** in **Data → Destinations** — it may not show up right away. Once it's there, sync it to activate it.
**📺 Confirm the destination and sync it**
Once you've filled in the destination below, tested it, and released it, come back here to **Data → Destinations**:
* Open your newly published destination.
* Click **Add New Sync** to activate it. This is a standard Amplitude step.
Amplitude uses a **developer portal** to create custom event streaming destinations. Opening the destination builder (**Data → Destinations → + Add Destination → search "HTTP" → Event Streaming**) is standard Amplitude navigation — see [Amplitude's HTTP destination docs](https://amplitude.com/docs/data/destination-catalog/http) if you need the general walkthrough. The Autoplay-specific part is what you configure once you're there:
**Fill in the Configuration tab**
**Integration Name** — give the destination a name, e.g. `autoplay-connector`.
**URL Endpoint**
| Field | Value |
| ------ | -------------------------------------------------------------------------------------------- |
| Method | `POST` |
| URL | Your `ingest_url` from Step 4 (e.g. `https://connector.autoplay.ai/ingest/prod__EpnUILl...`) |
**REST API Headers** — click **"Add New REST API Header"** and set:
| Header Key | Header Value |
| --------------- | ------------------------------------------------------------------------------------------------- |
| `Authorization` | `Bearer ` — replace `` with your actual `ingest_secret` from Step 4 |
**Event Body Editor** — replace the default Freemarker template with:
```
<#setting number_format="0.####">
<#assign et = input.event_type!''>
<#assign ep = input.event_properties!{}>
<#assign up = input.user_properties!{}>
{
"events": [
{
"event_type": "<#if et?starts_with('Viewed') || et == '[Amplitude] Page Viewed' || et == 'Page Viewed'>$pageview<#elseif et == '[Amplitude] Element Clicked' || et == '[Amplitude] Element Changed' || et?starts_with('Form')>$autocapture<#else>${et?json_string}",
"user_id": "${(input.user_id!'')?json_string}",
"device_id": "${(input.device_id!'')?json_string}",
"session_id": ${input.session_id!0},
"time": ${input.time!0},
"event_time": "${(input.event_time!'')?json_string}",
"user_properties": {
<#list up?keys as k>"${k?json_string}": <#if up[k]?is_string>"${up[k]?json_string}"<#elseif up[k]?is_number>${up[k]?c}<#elseif up[k]?is_boolean>${up[k]?c}<#else>null<#sep>,
},
"event_properties": {
"[Amplitude] Page URL": "${(ep['Page URL']!ep['Page Location']!ep['[Amplitude] Page URL']!ep['[Amplitude] Page Location']!'')?json_string}",
"[Amplitude] Page Title": "${(ep['Page Title']!ep['[Amplitude] Page Title']!'')?json_string}",
"$event_type": "<#if et == '[Amplitude] Element Changed'>change<#elseif et?starts_with('Form Submitted')>submit<#elseif et?starts_with('Form Started')>focus<#else>click",
"$current_url": "${(ep['Page URL']!ep['Page Location']!ep['[Amplitude] Page URL']!ep['[Amplitude] Page Location']!'')?json_string}",
"$button_text": "${(ep['[Amplitude] Element Text']!ep['Element Text']!ep['Page Title']!'')?json_string}",
"$elements_chain": "${(ep['[Amplitude] Element Path']!ep['Element Path']!'')?json_string}",
"$element_id": "${(ep['[Amplitude] Element ID']!ep['Element ID']!'')?json_string}",
"$element_tag": "${(ep['[Amplitude] Element Tag']!ep['Element Tag']!'')?json_string}"<#list ep?keys as k><#if k?starts_with('$') || k?starts_with('[Amplitude]')><#else>, "${k?json_string}": <#if ep[k]?is_string>"${ep[k]?json_string}"<#elseif ep[k]?is_number>${ep[k]?c}<#elseif ep[k]?is_boolean>${ep[k]?c}<#else>null
}
}
]
}
```
**Optional: limit streaming to an experiment cohort**
If you're running an Autoplay onboarding experiment, configure the sync to send only the experiment group to Autoplay:
1. In **Select & filter events**, keep **All Events**.
2. Click **+ where** and filter on the user properties you set in Step 3.
3. For example: `autoplay_experiment_group = autoplay`, optionally combined with any eligibility property like `plan = trial`.
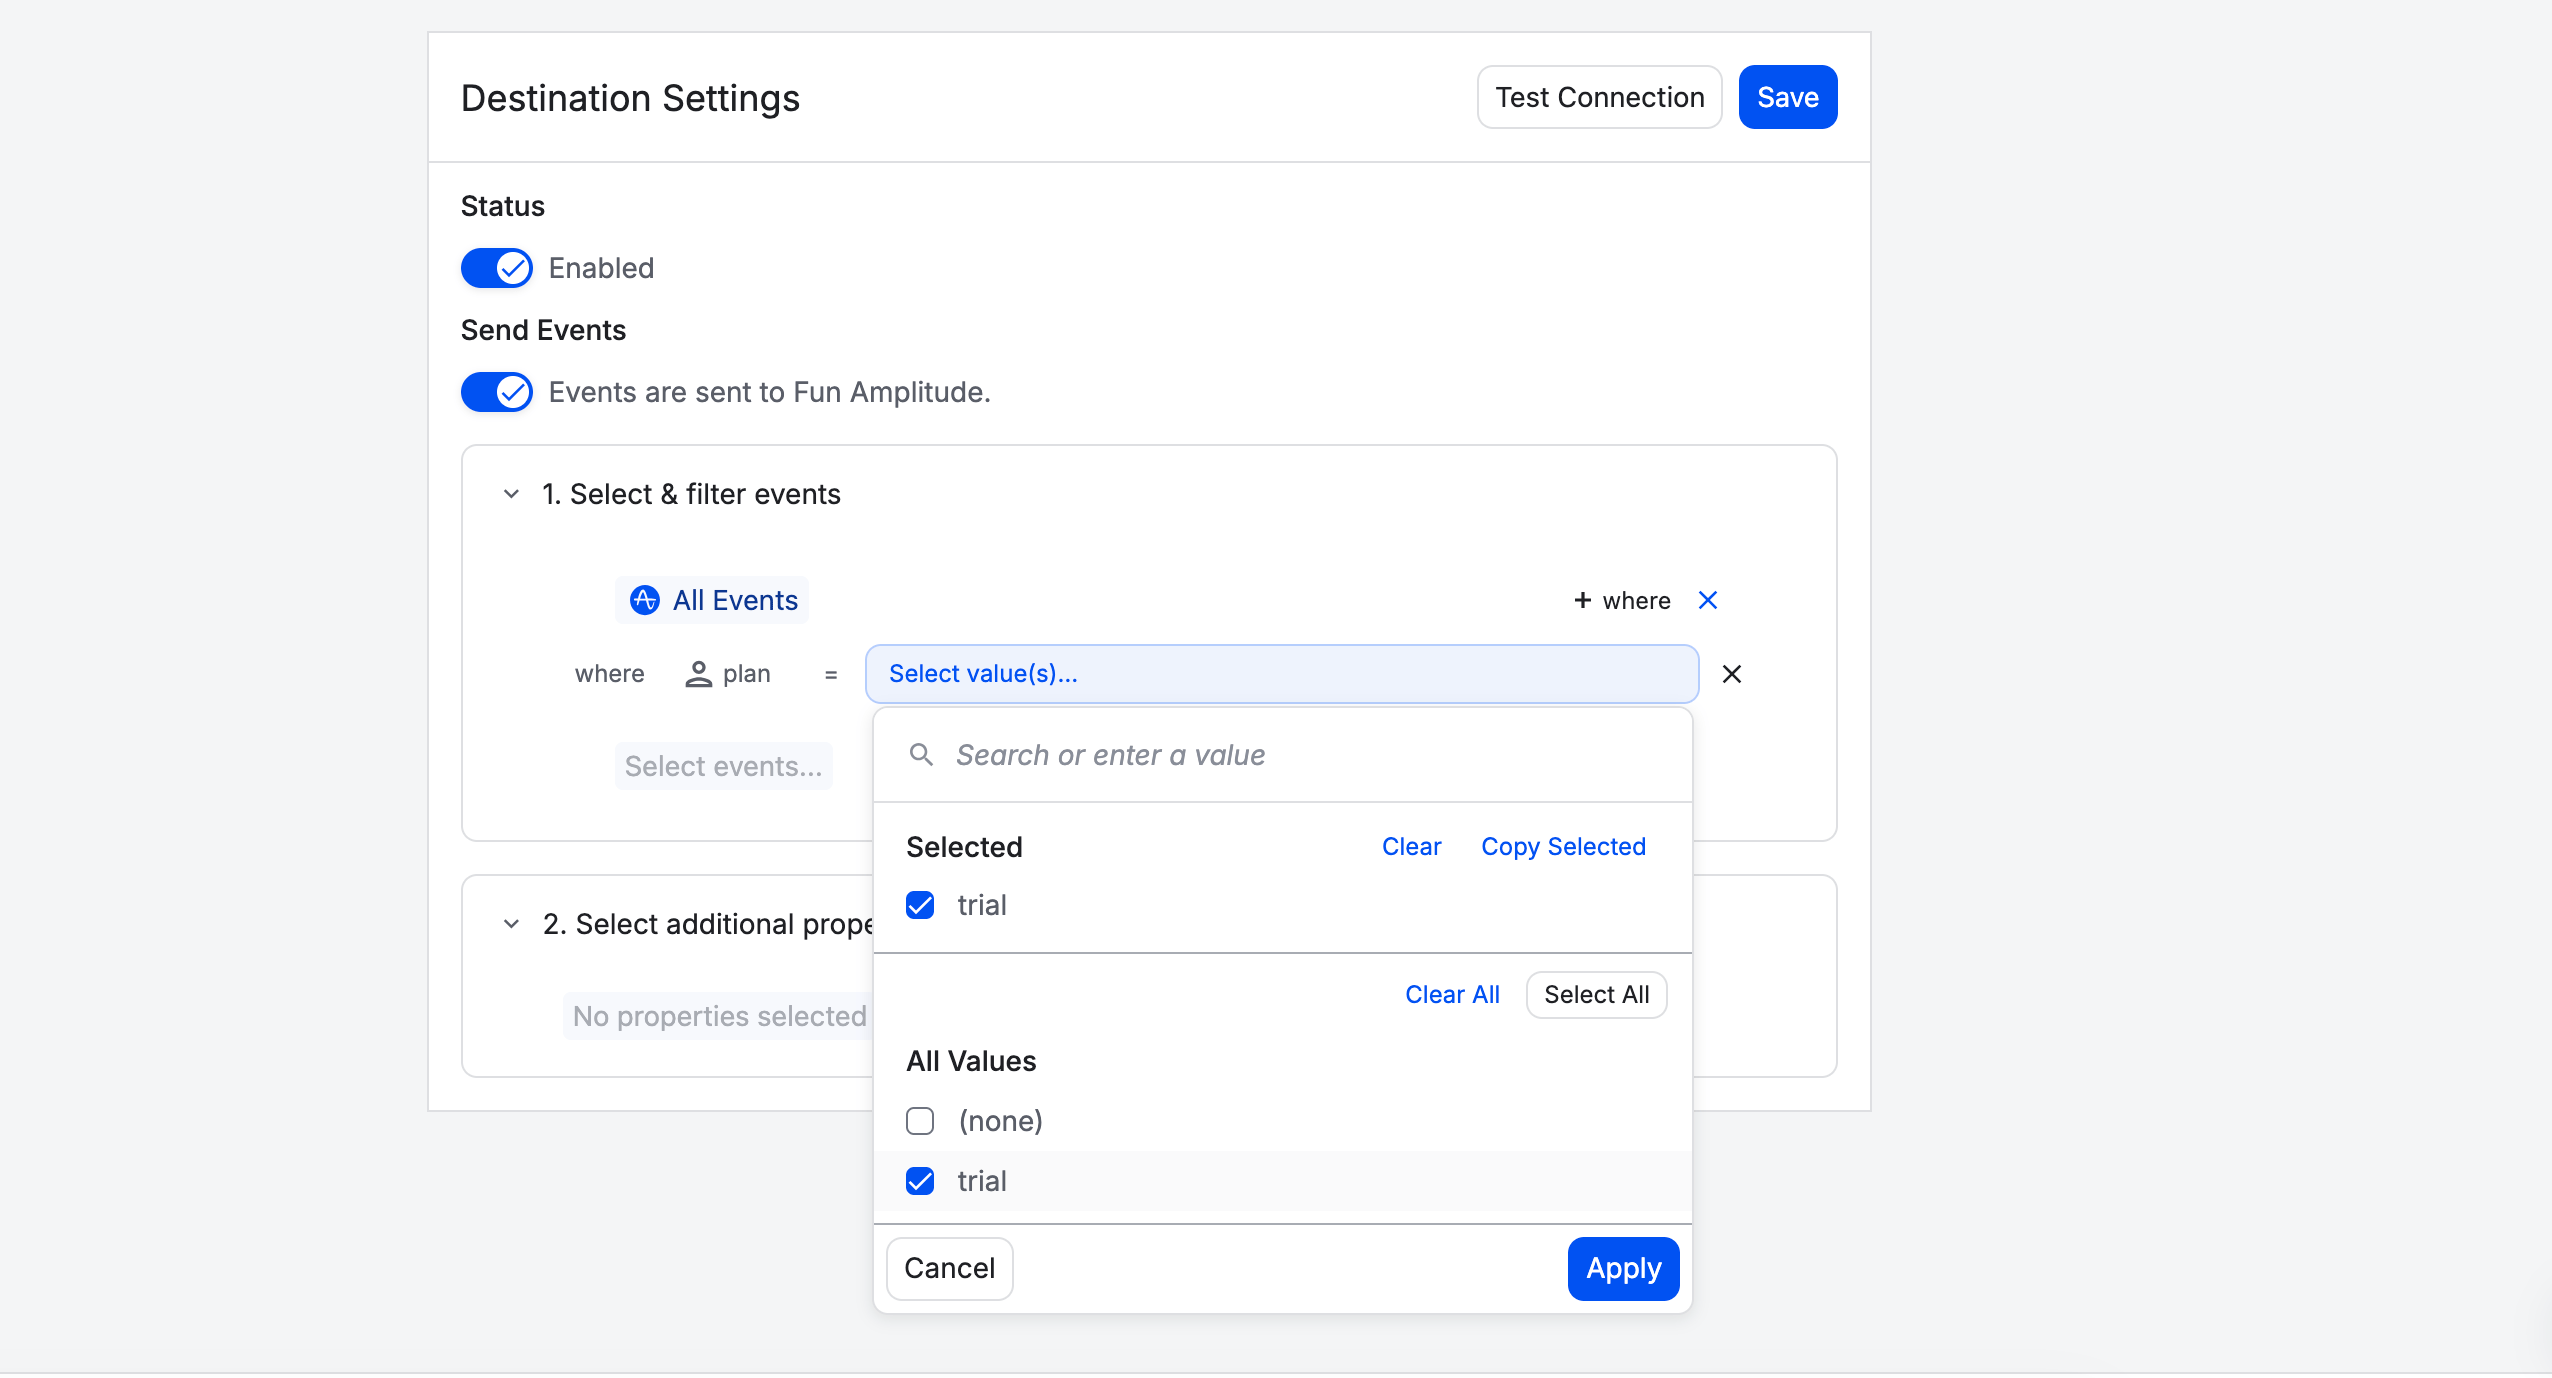 This means Amplitude will not forward comparison-group events to the Autoplay connector for this destination. Keep the assignment stable in your app or experimentation system so users do not move between groups during the trial. Amplitude's event streaming destination supports filtering on selected event types and property conditions; see [Amplitude's event streaming integration docs](https://amplitude.com/docs/partners/create-an-event-streaming-integration#event-streaming-considerations).
On the **Testing** tab:
* Toggle **Send Events** on. Without this, Amplitude builds the request but never sends it.
* Under **Select & filter events**, leave **All Events** selected — unless you're limiting to an experiment cohort, as described above.
* Click **Test Connection**. You should see a `200 OK` response.
* Click **Release** to publish the destination.
Then follow the **Confirm the destination and sync it** steps above to activate it. Once the sync is active, Amplitude streams all events to your connector endpoint in real time.
### 🔌 Next: connect your AI support agent
Your activity is now flowing into the connector. Head back to Quickstart to choose your existing AI support agent and connect it via MCP — it then pulls a user's live activity on demand, the moment it needs context to answer.
Fin (Intercom), Maven, Ada, Botpress, and more — pick yours and connect via MCP.
This means Amplitude will not forward comparison-group events to the Autoplay connector for this destination. Keep the assignment stable in your app or experimentation system so users do not move between groups during the trial. Amplitude's event streaming destination supports filtering on selected event types and property conditions; see [Amplitude's event streaming integration docs](https://amplitude.com/docs/partners/create-an-event-streaming-integration#event-streaming-considerations).
On the **Testing** tab:
* Toggle **Send Events** on. Without this, Amplitude builds the request but never sends it.
* Under **Select & filter events**, leave **All Events** selected — unless you're limiting to an experiment cohort, as described above.
* Click **Test Connection**. You should see a `200 OK` response.
* Click **Release** to publish the destination.
Then follow the **Confirm the destination and sync it** steps above to activate it. Once the sync is active, Amplitude streams all events to your connector endpoint in real time.
### 🔌 Next: connect your AI support agent
Your activity is now flowing into the connector. Head back to Quickstart to choose your existing AI support agent and connect it via MCP — it then pulls a user's live activity on demand, the moment it needs context to answer.
Fin (Intercom), Maven, Ada, Botpress, and more — pick yours and connect via MCP.